Qemulator Virtualization Solution for Ubuntu Feisty

I just ran into another Virtualization solution called Qemulator, it is a full featured emulation suite for the qemu virtual engine, written in python GTK/Glade2. I have not had the chance, time yet to test it out, but by the looks of the screenshots, it may be better than Vmware, please let me know what you think if you have tried this before I have.
Qemulator provides an easy and fast to use image and device management, a "My machines" list and interactive job control.
It comes with a list of all running jobs from where you can open the contol panel for each job and performing on demand action. Full interaction for mounted volumes, usb devices, keyboard and mouse interaction, screenshots, wave capture and save/restore machine state and open vnc viewer is provided.
The project is still under development. Current version should run stable on most Linux machines providing allmost all functions of qemu, but there are still some works to do.
Qemulator comes with its own easy to use graphical installer.
Qemu 0.8 - 0.9 compatible
- Changed filesystem and boot logic to a more simple and clear context
- Many new qemu options found their way to the gui
- Many functions are enhanced by image autodetection
- Added new guided dialogs to add new machines and to install new systems
- Creating of new images now includes all common qemu-img options
- Implemented Exporting of a VM configuration as shellscript
- New translations: Catalan, Slovenian
- Many bugs fixed (see buglist)
For full list of changes read the release notes on project home or distributed with the package![]()
Qemulator 0.5 - Ubuntu package
qemulator_0.5-1ubuntu1_all.deb
Download distributed from www.uv.es/cuan/repos/
Many thanks to Toni Cuñat for the packages!
PGP signature file: qemulator_0.5-1ubuntu1.dsc
Repository address has changed, so add this new sources to your apt package management to keep qemulator up to date with your regular system updates:
deb http://www.uv.es/cuan/repos feisty extras
deb-src http://www.uv.es/cuan/repos feisty extras
Attention: You can use this repository without any harm to install and update Qemulator for Ubuntu 6.06 although it's a feisty repository. If there will be other programs on this repository in future, it is highly recommendet, that you don't install them on your dapper (Ubuntu 6.06) system, because genrally some feisty packages can harm or even destroy your dapper system!
Packages in this repository can be gpg authenticated. The key that is being used for signing the packages is 532190AF. You can enter this key into the APT trusted keys database with the following command:wget http://www.uv.es/cuan/repos/532190AF.gpg -O- | sudo apt-key add -
Install Mplayer and Multimedia Codecs (libdvdcss2,w32codecs) in Ubuntu Feisty Fawn,Dapper,Edgy
MPlayer is a movie and animation player that supports a wide range of codecs and file formats, including MPEG 1/2/4,DivX 3/4/5, Windows Media 7/8/9, RealAudio/Video up to 9, Quicktime 5/6, and Vivo 1/2. It has many MX/SSE (2)/3Dnow(Ex) optimized native audio and video codecs, but allows using XAnim’s and RealPlayer’s binary codec plugins, and Win32 codec DLLs. It has basic VCD/DVD playback functionality, including DVD subtitles, but supports many text-
based subtitle formats too. For video output, nearly every existing interface is supported. It’s also able to convert any supported files to raw/divx/mpeg4 AVI (pcm/mp3 audio), and even video grabbing from V4L devices.
Install Mplayer in Ubuntu Dapper Drake
You need to add the following lines to /etc/apt/sources.list file
gedit /etc/apt/sources.list
enter these two lines and save your file
deb http://archive.ubuntu.com/ubuntu dapper universe multiverse
deb-src http://archive.ubuntu.com/ubuntu dapper universe multiverse
Install Mplayer in Ubuntu Edgy eft
You need to add the following lines to /etc/apt/sources.list file
gedit /etc/apt/sources.list
enter these two lines and save your file
deb http://archive.ubuntu.com/ubuntu edgy universe multiverse
deb-src http://archive.ubuntu.com/ubuntu edgy universe multiverse
Install Mplayer in Ubuntu Feisty Fawn
You need to add the following lines to /etc/apt/sources.list file
gedit /etc/apt/sources.list
enter these two lines and save your file
deb http://archive.ubuntu.com/ubuntu feisty universe multiverse
deb-src http://archive.ubuntu.com/ubuntu feisty universe multiverse
Now you need to run the following command to update the source list
sudo apt-get update
Install mplayer using the following command
sudo apt-get install mplayer
if you want to open mplayer just type
gmplayer
or
You can Open from Applications—>Sound&Video—> Mplayer Movie Player
Once it opens you should see the following screen
Installing libdvdcss2 and w32 video codecs in Ubuntu
Support for WMV, RealMedia and other formats has been bundled into the w32codecs package. This package is not available from the Ubuntu repositories due to licensing and legal restrictions.
Edit /etc/apt/sources.list file and enter the following repositories
sudo gedit /etc/apt/sources.list
You can install this DVD playback and w32codecs using Seveas Repository
For Ubuntu Dapper Drake Users
deb http://mirror.ubuntulinux.nl dapper-seveas all
deb-src http://mirror.ubuntulinux.nl dapper-seveas all
For Ubuntu Edgy Eft Users
deb http://mirror.ubuntulinux.nl edgy-seveas all
deb-src http://mirror.ubuntulinux.nl edgy-seveas all
Now you need to copy the key using the following command
wget http://mirror.ubuntulinux.nl/1135D466.gpg -O- ¦ sudo apt-key add -
For Ubuntu Feisty Fawn Users
deb http://medibuntu.sos-sts.com/repo/ feisty free non-free
deb-src http://medibuntu.sos-sts.com/repo/ feisty free non-free
Now you need to copy the key using the following command
wget -q http://packages.medibuntu.org/medibuntu-key.gpg -O- ¦ sudo apt-key add -
Update the source list using the following command
sudo apt-get update
Install Codecs using the following command
sudo apt-get install w32codecs libdvdcss2
Using above download locations you can install most of the mutimedia codecs for ubuntu.
sudo apt-get update
Mplayer Plugin for Firefox
If you want to install Mplayer with plug-in for Firefox run the following command
sudo apt-get install mozilla-mplayer
How to connect Motorola V3X to ubuntu 7.04 with USB port

I am a big fan of motorola and Nokia, here is a simple how to to get your motorola connected through Ubuntu.
In this tutorial we will learn how connect your Motorola V3X to ubuntu 7.04 trough usb
Setup Cingular Blackjack i607 as a USB modem in Ubuntu Feisty

Luckily the phone, once connected by the supplied USB cable, is automatically recognized by Feisty (Ubuntu 7.04) and the proper kernel modules and devices are loaded. All that remain is for you to run gnome-ppp as root, configure the connection and enjoy.
If you don't have gnome-ppp just install it using Synaptic or apt-get.
Open gnome-ppp as root by either creatinga desktop launcher with "gksudo gnome-ppp" as the command line or typing that into the command line your self.
Enter credentials ISP@CINGLARGPRS.COM for the username
CINGULAR1 as the password
*99# as the phone number.
Click setup
Click detect to auto detect your modem (it shoudl find it as ttyACM0)
Click init string andmakemake the following changes:
Init 2 should read: ATQ0 V1 E1 S0=0 &C1 &D2 +FCLASS=0
Init 3 should read: AT+CGDCONT=1,"IP","isp.cingular"
Close "setup" and click on connect. After a sort pause at "Waiting for prompt" it should connect you.
Hope that helps someone else. You can of course configure it to dock into the system tray too.
Use your Treo 650 internet connection for Ubuntu via GPRS

Software
Make sure you are running the latest versions of firmware for the Treo 650. I happen to have an unlocked edition so this is very easy to fix from PalmOne. I recommend going with the latest but this isnt a deal breaker. I am going to assume this from a total newbie position as yes, you can use pppd or wvdial from CLI. For our test we will be using Ubuntu 6.06 and Gnome-ppp. To enable “tethered” mode on the Treo you maybe lucky and dial #*83843733. I was unable with GSM and Cingular and instead used this software which works wonderfully. If anything they also officially support Linux.
http://mobile-stream.com/usbmodem.html
Hardware
The hotsync USB cable will be all that is needed. I have problems in the past plugging into an external USB hub so keep that in mind.
Installing Software
I downloaded the USB Treo program and explored the zip file. I extracted the PRC to a SD-CardPALM\LAUNCHERS
apt-get install gnome-ppp
Gnome-PPP Settings
Before we can even start on that portion of the install lets enable a few LCP options we will need to ensure the connection stays put.sudo vi /etc/ppp/options
lcp-echo-failure 4
lcp-echo-failure 0
u: WAP@CINGULARGPRS.COM
p: CINGULAR1*99***1#
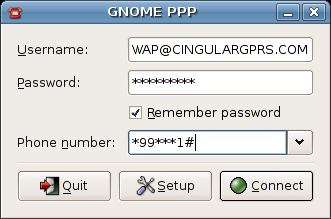
Lets digg into some of the options you may need to check to ensure this is transparent:
Init Strings needed: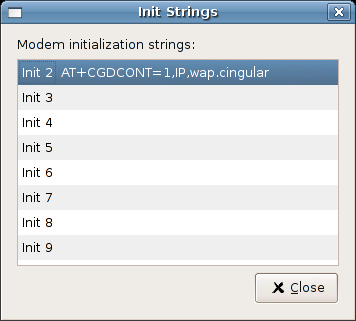
Setup Dialog Box 1: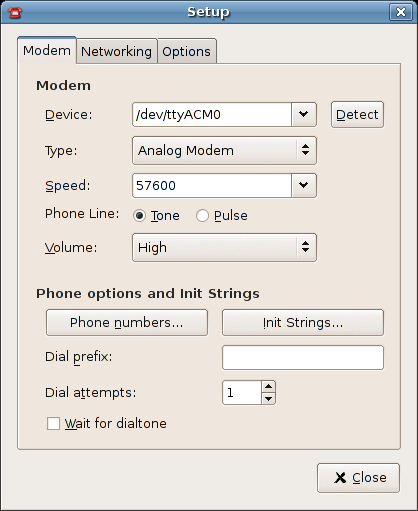
Setup Dialog Box 2: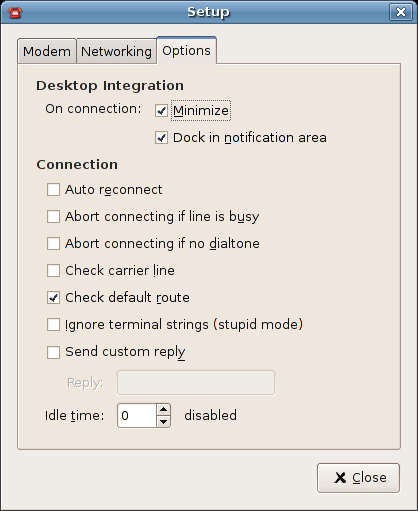
After all is said and done. Click connect! You should see the gnome-ppp dock itself and lights start flashing. Something to keep in mind is that if your default route is pointing to eth0/wifi0 you will need to pull those interfaces down before the ppp0 can take over. Enjoy!
Howto: Share Ubuntu Connectivity with your Nokia Symbian Phone

This guide will let you share your internet connection by Bluetooth
so that you can surf the net on your bed without paying high GPRS/HSDPA rates.
Im just summarizing the steps, credits goes to the author of websites at the end of this post
My setup:
Nokia n73 (most Symbian phones will do, even Sony Ericsson's)
Feisty i386 (just about any distro will do)
bluetooth dongle supported by Ubuntu (mine is CSR)
wireless connection to AirStation router
Pair up your phone and your computer
Make sure you have bluez-gnome installed, otherwise install it by the following command:
aptitude install bluez-gnome
Make sure you have a bluetooth icon in the notification area (otherwise you can't set PIN while pairing)
On your phone, go to Connect > Bluetooth >. Paired devices > Option > New paired device, choose your computer
Setup your phone:
Backup your phone!
I can't fix your phone if anything goes wrong
Install gnubox for Series 60 v3 (http://discussion.forum.nokia.com/forum/archive/i ndex.php/t-96953.html) or other Symbians (http://gnubox.dnsalias.org/gnubox/#download)(if you have a s60v3 phone, you will have to sign the sis file. just follow the instruction on the download page, 5th reply)
Run gnubox, Options > Debug > Dump Full CommsDB, this dump the network configuration, in case any thing goes wrong
Create an Access point, goto Tools > Settings > Connection > Accesspoints
Name it "Bt" (case sensitive), set Data Bearer to "data call" and dial-up number to some random number
Run gnubox again, Options > Install > Create records
Restart gnubox, Options > Install > set RAS login script
Restart gnubox, Options > 2box Bluetooth > LAN Access server, select your computer, no encryption if it ask
Setup your ubuntu
Put the following into /etc/ppp/peers/dun
115200
noauth
192.168.11.30:192.168.11.40 (this has to be in the same subnet as your computer, ie. the first-three set of digits have to be the same)
crtscts
ms-dns
lock
execute the following as root, to setup network forwarding, otherwise you can only access LAN from the phone
echo 1 > /proc/sys/net/ipv4/ip_forward
dund --msdun --listen call dun
DONE! grab your phone, fire up the Web app. and enjoy!
References
http://gnubox.dnsalias.org/gnubox/
http://mikie.iki.fi/symbian/bt-ap.html
Howto: Sync an iPod with Ubuntu
You need an iPod already formatted in Windows through iTunes, before you can proceed with this Howto. My iPod nano was already formatted with a Windows filesystem (fat32) as a factory default, but you may have one which uses the Mac filesystem. Installing GTKPod If you want AAC support for GTKPod, type the following command in in the terminal: without ACC support, the command would be: Mounting the iPod First create the corresponding directory as a mount point for your iPod: Let GEdit open the file fstab: Add at the bottom: Configuring GTKPod However, the most important field in that entire preferences window is the iPod mount point field in the Input/Output tab. Fill in the mount point field with the appropriate folder (in this example /media/iPod). Restart the program. It will automatically fill the GTKPod database with all of the songs and playlists that you have stored on your iPod prior to setting up GTKPod. When problems occur sdc2 being the partition where your iPod data resides. Be sure to check out /etc/mtab with gedit in order to confirm which /dev/ node is being used for your iPod. The above command will execute dosfsck, and automatically fix any errors encountered in the vfat partition. Have fun!
Here is a quick easy & efficent way to syncronize your ipod with Ubuntu.Prerequisites
I'm using the program GTKPod for synchronizing my songs to the iPod. So first of all, you should install GTKPod.sudo apt-get install gtkpod-aac
killall gnome-panelsudo apt-get install gtkpod
You can't have both installed at the same time.
Now we're creating a mount point. You can skip this step, if Gnome created already one for you in the /media directory automatically.
sudo mkdir /media/iPodsudo gedit /etc/fstab
/dev/sdc2 /media/iPod vfat nosuid,noauto,nodev,rw,umask=077,gid=1000,uid=1000,user,defaults,noatime,iocharset=utf8 0 0
When you go into GTKPod, go to Edit -> Preferences, Input/Output tab. I personally didn't get the auto mount/unmount thing working, so I left it unchecked.
However, here is the rub: GTKPod seems to work randomly for different people. It will work on one synchronization, yet it will stop working for subsequent synchronizations. Others will find that it will not work, period. There's a simple solution to that, actually; just type the following command in into your console app:sudo dosfsck -a /dev/sdc2
After that, GTKPod should work flawlessly without your system automatically mounting your iPod as read only. Now you can also write on your iPod and therefore synchronize your MP3 and AAC files.
Introducing ioXChat

I found yet another blazing fast Infodomestic Objects application made just for Ubuntu Feisty, its Xchat, we all know what that is right? Its an IRC client for Ubuntu but prelinked with Infodomestic Objects so you can run it without installing the dependencies, this means you can run xchat without installing it, Xchat also loads faster and runs more smoothly.
Download Here
Introducing ioSwiftFox

Wow, I just found a truly unique application that runs fast as hell right from memory and does not require root access to install, so you non-root users can download this single file and you dont have to install a thing, it runs straight from ram and /tmp and believe it or not, it is faster than firefox and swiftfox because it is all pre-linked. No compiling, installing or anything is necessary.
"ioSwiftFox is a recompilation of Firefox 2 for Infodomestic Objects Linux. It is developed and tested under Ubuntu Linux, and can be run with just one click without installation on your system."
ioSwiftfox is secure as well, since it runs in ram, so you dont have to worrie about people sn00ping your browser history. This also auto loads your extentions in your current swiftfox/firefox directory if you do happen to have it installed.
Howto:
Download here
chmod +x ioSwiftFox2.0.0.6-pentium4_Infodomestic0.8.5
mv ioSwiftFox2.0.0.6-pentium4_Infodomestic0.8.5 ioswiftfox
./ioswiftfox
Heron (Ubuntu 8.04) and The Future
Heron (Ubuntu 8.04), the next version of Ubuntu that will succeed Gutsy Gibbon (Ubuntu 7.10, due for release in October 2007). Not only will the Ubuntu community continue to do what it does best, produce an easy-to-use, reliable, and fun free software platform, but this release will proudly wear the badge of Long Term Support (LTS) and be supported with security updates for five years on the server and three years on the desktop. I am hoping to see Ubuntu in every school in the United States.
We Can all make this possible by sharing our knowledge & compassion to our friends, families, co-workers and the community. The LoCo project is here to help groups of Ubuntu fans and enthusiasts work together in regional teams to help advocate, promote, translate, develop and otherwise improve Ubuntu. Our worldwide network of LoCo teams is providing a strong backbone to our already vast and extensive Ubuntu community. Why not go and see the full list of teams!
Ever since the birth of computers, enthusiasts and fans around the world have collected together in garages, universities and pubs to talk about their interest, learn from each other and help promote their interest. Combine this with the huge popularity of Ubuntu, and you have the Ubuntu LoCo project. So lets continue this history and share what we love, and the benifits we have to offer Ubuntu as well as what Ubuntu has to offer us as a community & world we live in.
I want to JOIN a LoCo team! - To join a LoCo team, take a look at the Joining page and get in touch with the contact of the team you want to join.
I want to START a LoCo team! - To start a team, or contribute to one, read the LoCo Team HOWTO!
Most people only ever see the end-user view of Ubuntu, running it on their desktops, servers and mobile devices around the world. For these users, Ubuntu provides a simple, convenient means to do what they want to do easily, effectively and without unnecessary complexity. For many of us though, we want to open up the hood and understand how the system works and how to extend and grow it. Thousands of us get out of bed every day, united behind Ubuntu, ready to make a difference, working together to make our vision happen.
Read more here
One of the great things about the Ubuntu Community is that you are able to Invent applications and features for the next Ubuntu Release via Ubuntu BluePrints, with the communities knowledge and compassion we are able to make each Ubuntu Release better than ever with more features that are needed most. I strongly recommend Ubuntu BluePrints for the simple fact that just with one Idea may be able to see it in the Main Releases of Ubuntu. Why not share your knowledge compassion and troubles you are having with ideas to improve Ubuntu?
Share your ideas, and let Ubuntu Grow within us and the community here
Amazing Ubuntu Wallpapers
check it out, here is my collection of wallpapers..
Click above on any pic to be directed to my public picasa album
Feel free to comment telling me what you think, also if you have something I can add to my collection let me know!
Block Ads with Ubuntu without installing anything
okay in one of my nights searching the internet and ubuntu forums i came a cross a nice tweak for Ubuntu. It involves messing with your etc/hosts file in order to block web sites that produce ads. Cool eh? Here is how:
1. back up your original host file located at etc/hosts
sudo cp /etc/hosts /etc/hosts.old
2. Download a good/updated host file here
3. Open your hosts file
sudo gedit /etc/hosts
4. Paste the contents of the downloaded hosts file (from mvps) into the bottom of the /etc/hosts - do not override any content!
5. Test it out, try loading one of the sites in your browser. You should get a 404 error message.
To take this even further you can use a hosts file update script located here
Follow these steps
1. Download the file at http://hostsfile.mine.nu/downloads/updatehosts.sh.txt
2. Rename updatehosts.sh.txt to updatehosts.sh
3. Make the file executable by doing using the follow command
chmod a+x updatehosts.sh
4. Install tofrodos
sudo apt-get install tofrodos
5. Run the update
sudo ./updatehosts.sh
This tweak has been tested and seems to work 100% on Ubuntu FF - no guarantees
HOWTO: Right Click-Convert videos to Ipod / Smartphone format Quickly and Easily
Found a little script that will convert videos to IPod video format (i.e. mp4 with xvid and aac encoding) utilising ffmpeg and ruby. The nice thing about this is that it will preserve the original aspect ratio and add black bars depending, so videos look like they should do (well aside from being in QVGA 320x240 resolution!). Some smartphones (such as the Nokia N95) are also able to display this format =)
The script can be found here
For a little HOWTO:
Open up synaptic and ensure that you have ffmpeg and ruby installed/
apt-get install ruby ffmpeg liblame-dev libxvidcore4-dev libx264-dev libfaac-dev libfaad2-dev
sudo apt-get build-dep ffmpeg
Download the script:wget http://thomer.com/howtos/mp4ize
chmod +x mp4ize
sudo mv mp4ize /usr/local/bin
If everything goes well, your output will look like this:
root@ion:/extra/movies/Life.Support.DVDRip.XviD-BeStDivX/Sample# ls
bestdivx-lifes-sample.avi
root@ion:/extra/movies/Life.Support.DVDRip.XviD-BeStDivX/Sample# mp4ize bestdivx-lifes-sample.avi
FFmpeg version SVN-rUNKNOWN, Copyright (c) 2000-2004 Fabrice Bellard
configuration: --prefix=/usr --libdir=${prefix}/lib --shlibdir=${prefix}/lib --incdir=${prefix}/include/ffmpeg --enable-shared --enable-mp3lame --enable-gpl --enable-faad --mandir=${prefix}/share/man --enable-vorbis --enable-pthreads --enable-faac --enable-xvid --enable-dts --enable-amr_nb --enable-amr_wb --enable-pp --enable-libogg --enable-libgsm --enable-x264 --enable-a52 --extra-cflags=-Wall -g -fPIC -DPIC
libavutil version: 49.0.0
libavcodec version: 51.11.0
libavformat version: 50.5.0
built on Nov 3 2006 21:14:27, gcc: 3.3.5 (Debian 1:3.3.5-13)
Input #0, avi, from 'bestdivx-lifes-sample.avi':
Duration: 00:01:00.0, start: 0.000000, bitrate: 1071 kb/s
Stream #0.0: Video: mpeg4, yuv420p, 576x320, 23.98 fps(r)
Stream #0.1: Audio: mp3, 48000 Hz, stereo, 160 kb/s
Must supply at least one output file
FFmpeg version SVN-rUNKNOWN, Copyright (c) 2000-2004 Fabrice Bellard
configuration: --prefix=/usr --libdir=${prefix}/lib --shlibdir=${prefix}/lib --incdir=${prefix}/include/ffmpeg --enable-shared --enable-mp3lame --enable-gpl --enable-faad --mandir=${prefix}/share/man --enable-vorbis --enable-pthreads --enable-faac --enable-xvid --enable-dts --enable-amr_nb --enable-amr_wb --enable-pp --enable-libogg --enable-libgsm --enable-x264 --enable-a52 --extra-cflags=-Wall -g -fPIC -DPIC
libavutil version: 49.0.0
libavcodec version: 51.11.0
libavformat version: 50.5.0
built on Nov 3 2006 21:14:27, gcc: 3.3.5 (Debian 1:3.3.5-13)
Input #0, avi, from 'bestdivx-lifes-sample.avi':
Duration: 00:01:00.0, start: 0.000000, bitrate: 1071 kb/s
Stream #0.0: Video: mpeg4, yuv420p, 576x320, 23.98 fps(r)
Stream #0.1: Audio: mp3, 48000 Hz, stereo, 160 kb/s
Output #0, mp4, to 'bestdivx-lifes-sample.mp4':
Stream #0.0: Video: xvid, yuv420p, 320x240, q=3-5, 400 kb/s, 23.98 fps(c)
Stream #0.1: Audio: aac, 48000 Hz, stereo, 128 kb/s
Stream mapping:
Stream #0.0 -> #0.0
Stream #0.1 -> #0.1
Press [q] to stop encoding
frame= 1439 q=3.0 Lsize= 3734kB time=59.9 bitrate= 510.6kbits/s
video:2763kB audio:936kB global headers:0kB muxing overhead 0.928542%
root@ion:/extra/movies/Life.Support.DVDRip.XviD-BeStDivX/Sample# ls
bestdivx-lifes-sample.avi bestdivx-lifes-sample.mp4
root@ion:/extra/movies/Life.Support.DVDRip.XviD-BeStDivX/Sample#
CFS Kernel Patch: The Completely Slow Scheduler!
I constantly upgrade my kernel and constantly keep applications updated, I have been reading many sites proclaiming that CFS patchset "The Completely Fair Scheduler" from Ingo Molnar is better and faster than Con Kolivas 2.6.22-ck1 patchset
I am extremely dissapointed in all the hype and the news that cfs will be a part of kernel 2.6.23...
Here is what I noticed about cfs which sucks...
Boot time:5 seconds longer than ck patch
Nautilus: Takes a second longer to load up... wtf
Firefox: takes 2 more seconds to load, simple web pages like digg and my site spike to 100 cpu usage and mouse freezes..
Music: Choppy with more cpu usage
Video: glxgears reported a loss of over 100 fps
Overall CFS sucks, and ck's patchset kicks ass, I have ck's patchset installed with the latest ubuntu feisty kernel as well as the "The Completely Slow Scheduler CFS"
I would love to see some benchmarks of how cfs is faster than CK and what it actually improves. Also I cannot believe Linus is implementing this POS Patchset..
This is a true dissapointment for the Linux Community, I now understand why Con Kolivas quit because there is so many ignorant people out there that dont respect a good coders work. Ck's patchset is way faster than CFS, CFS is garbage and im only keeping it on my pc to do benchmarks when requested.
Be smart get Con Kolivas Patchset here and do you and the Linux community a favor and actually try out CFS and let me know what you experience
Here are my benchmark results with hardinfo:
cK patchset
cfs the slow scheduler
Howto: Encrypt your private files with Encfs & Cryptkeeper Gnome applet

I have been using this little applet called cryptkeeper with encfs for a while now, it is a beautifully simple power user application that will help you keep your private information safe and secure.
Basically Cryptkeeper is a Linux system tray applet that manages EncFS encrypted folders. In this simple Howto, I will assist you in installing encfs and CryptKeeper.
1. Install encfs like this:
sudo apt-get install encfs
sudo echo fuse >> /etc/modules
sudo modprobe fuse
sudo addgroup
2. Then you must log off and back on again.
To do this quickly just press ctrl+alt+backspace and log back in.
Then Download & Install Cryptkeeper via Getdeb.net here
or wget http://www.getdeb.net/download.php?release=1177&fpos=0
Then click Applications->system tools->Cryptkeeper or alt F2 type in Cryptkeeper.
I personally like cryptkeeper to Autostart, if you want to do this press alt+F2 type/paste gnome-session-properties and add "cryptkeeper" without the quotes to start it up automatically
-- I personally am the administrator where I use this so I like to run cryptkeeper as root via gksudo as an added form of protection, you decide.
Resources:
Cryptkeeper Developer Tom
EncFS Wikipedia
EncFS Developer Site
25 useful commands in Linux/UNIX for Beginners
I just ran accross a nice site www.go2linux.org the admin left a nice comment about my layout and content, thankyou.. while browsing his site I found some great content on 25 usefull linux commands I definately use daily, the author added 7 of his favorites
Check it out here
Id like to add a few commands I use as well.
htop: nice looking top for process and memory stats.
id: to check which user groups you belong to
whoami: check which user you are in a multi-user environment
echo;
example: echo * in your current directory to show you files if somehow you deleted ls - lol
example: echo whatever >>/etc/network/interfaces
cat: I like cat because I paste scripts and code right into the terminal like this:
cat >>file
type stuff/paste stuff here
cat file
root@ion:~# cat file
type stuff/paste stuff here
root@ion:~#
Resources:
linuxcommand.org
btw, feel free to share your advanced bash hacks/commands here
Drastically Improve Ubuntu Feisty 7.04 Performance with the performance patchset by Con Kolivas
My Ubuntu Box was running slower than I thought I could tweak it, so what I did was look for some good patchsets and I seen some conflicting results with cfs and ck and decided to test a few benchmarks and the ck patchset is a little more responsive than cfs on my system. I have supplied a link @ the end of this post with statistics and discussions about cK vs cfs.
Here is a guide for you to walk you through the patching/compiling process, I hope you like it!
*Warning*
If you have truecrypt installed or any kernel modules like the rt73 usb wifi driver, it must be recomiled/installed for the new kernel, the performance is worth the time and effort. Make sure you download anything you need to recompile driver wise before you reboot to the new kernel.
*The drivers must be recompiled while using the new kernel!
This How-To will guide you through the compilation/installation of the 2.6.22 (more recent than the one distribuited with Ubuntu Feisty 7.04) with the performance patchset by Con Kolivas.
1-Download what is needed
Type in the command line:
sudo apt-get install build-essential bin86 kernel-package
sudo apt-get install libqt3-headers libqt3-mt-dev (needed for make xconfig)
http://www.kernel.org/pub/linux/kernel/v2.6/linux-2.6.22.tar.bz2
Desktop Patch:
http://www.kernel.org/pub/linux/kernel/people/ck/patches/2.6/2.6.22/2.6.22-ck1/patch-2.6.22-ck1.bz2
Server Patch:
http://www.kernel.org/pub/linux/kernel/people/ck/patches/2.6/2.6.22/2.6.22-ck1/patch-2.6.22-cks1.bz2
2-Now, lets unpack the kernel source to /usr/src:
*Copy the source to /usr/src:
sudo cp linux-2.6.22.tar.bz2 /usr/src
cd /usr/src
sudo tar -xvjf linux-2.6.22.tar.bz2
sudo mv linux-2.6.22/ linux-2.6.22cK1
sudo rm -rf linux
sudo ln -s /usr/src/linux-2.6.22cK1 linux
*Change to /usr/src/linux:
cd /usr/src/linux
sudo -s -H
Password:
sudo bzcat /home/username/patch-2.6.22-ck1.bz2| patch -p1
*Import the configuration of the running kernel:
uname -r
sudo cp /boot/config-2.6.20-16-generic .config
*Configure the kernel:
sudo make xconfig
In "General Setup" activate:
-Support for paging of anonymous memory (swap)
--Support for prefetching swapped memory
In "Processor type and features":
-Processor family Choose the model of your processor.
Activate:
-Preemption Model
--Voluntary Kernel Preemption (Desktop)
-High Memory Support
--off -if you have less than 1 GB of RAM
--1GB Low Memory Support -if you have 1GB of RAM
--4GB -if you have more than 1GB of RAM
-Timer frequency
--1000 Hz
In "Device drivers" go to "Block devices" and in "IO Schedulers" leave only the "CFQ I/O scheduler" activated, which provides the best performance.
In "Kernel hacking" uncheck "Kernel debugging".
Ctrl+S to save the kernel configuration and then close the window.
5-Let's build the kernel:
*In a terminal make sure you are in /usr/src/linux with full root access.
We will build a ".deb" file that can be installed in our Ubuntu system, using make-kpkg.
*In a terminal type:
make-kpkg clean
make-kpkg -initrd --revision=ck1 kernel_image
*To install it:
sudo dpkg -i kernel-image-2.6.22*.deb
6-Reboot and everything should be running ok!
*Try:
uname -r
7-Nvidia graphic cards users:
To install Nvidia driver follow the guide (no need to install linux-headers as we have the source in /usr/src/linux:
http://www.ubuntuforums.org/showthre...ghlight=nvidia
Resources:
The Kernel patch homepage of Con Colivas
Discussions on CK vs CFS
Convert and Burn DIVX to DVD Easily with Wine & Ubuntu using ConvertXtoDVD
ConvertXtoDVD is a video converter software to convert and burn your videos to DVD. With ConvertXtoDVD and a few clicks you can backup your movies to DVD playable on any home DVD player. ConvertXtoDVD supports most popular formats such as AVI to DVD; Mpeg, Mpeg, Mpeg4, MP4, VOB, WMV, DV and stream formats to DVD. It converts your files into a compliant DVD Video set of files and burns it on a DVD media. The ConvertXtoDvd does not need an external AVI codec download. It uses its own AVI codecs. Looking for free video converter software? ConvertXtoDVD is free video converter evaluation software - a small payment and you no longer have the VSO watermark on the video output. The aspect ratio can be automatically selected or forced to a specific format. The program works for NTSC and PAL video formats and creates chapters automatically. Multiple audio tracks are supported. Version 2 uses a completely rewritten interface with subtitles support and a lot of new settings. VSO ConvertXtoDVD is neither affiliated with, nor using technology from Divx Networks! Key Features:

 I used to run this application all the time in windows.. Guess what? You can run it on Ubuntu with wine. There is allot of Converting,Encoding,Burning software for Linux but I love this little application, check it out, let me know what you think. btw the errors in the screenshot do not effect burning/reencoding at all, only the video preview function that sucks anyways :)
I'll hook you up with the full version here
Howto Install:
apt-get install wine
then download and unzip the package and run like windows :)
Here is some info from the ConvertXtoDVD site:
The Ultimate Burning Application for Ubuntu Linux
Experience the most comprehensive burning application for the Linux OS System Requirements:


 Nero Linux 3 is the ultimate burning application for Linux. Built on the award winning Nero Burning ROM 7 platform, Nero Linux 3 is not only the most powerful and versatile burning application available for Linux, but now the only application to offer Blu-ray Disc and HD DVD data burning support.
I'll supply you with the full version...
Why pay for this?
Get it Here
Howto Install:1) open a terminal
2) chmod +x keymaker
3) ./keymaker
4) cd /
5) tar xvzf /path/to/nerolinux-3.0.1.3-x86.tar.gz
6) start nerolinux and enter a serial
New torbutton Featured at Blackhat
I was just searching google for some BlackHat pdf's and ran accross a great firefox extention that works with tor. Here are some of the features.. Torbutton is a 1-click way for Firefox users to enable or disable the browser's use of Tor. It adds a panel to the statusbar that says "Tor Enabled" (in green) or "Tor Disabled" (in red). The user may click on the panel to toggle the status. If the user (or some other extension) changes the proxy settings, the change is automatically reflected in the statusbar. Some users may prefer a toolbar button instead of a statusbar panel. Such a button is included, and one adds it to the toolbar by right-clicking on the desired toolbar, selecting "Customize...", and then dragging the Torbutton icon onto the toolbar. There is an option in the preferences to hide the statusbar panel (Tools->Extensions, select Torbutton, and click on Preferences). Newer Firefoxes have the ability to send DNS resolves through the socks proxy, and Torbutton will make use of this feature if it is available in your version of Firefox. The development branch of Torbutton adds several new security features to protect your anonymity from all the major threats the author is aware of. The defaults should be fine for most people, but in case you are the tweaker type, or if you prefer to try to outsource some options to more flexible extensions, here is the complete list. (In an ideal world, these descriptions should all be tooltips in the extension itself, but Firefox bugs 45375 and 218223 currently prevent this). Currently, this is tied to the "Block history writes during Tor" setting. If you have enabled that setting, all formfill functionality (both saving and reading) is disabled. If this bothers you, you can uncheck that option, but both history and forms will be saved. To prevent history disclosure attacks via Non-Tor usage, it is recommended you disable Non-Tor history reads if you allow history writing during Tor. This is a tough one. There are thousands of Firefox extensions: making a complete list of ones that are bad for anonymity is near impossible. However, here are a few examples that should get you started as to what sorts of behavior are dangerous.
This is a c/p right from the developers site:
Download/install hereAbout
Description of Options
FAQ
When I use Tor, Firefox is no longer filling in logins/search boxes for me. Why?
50 Things You Need to Know About Ubuntu (10-1)
Sorry for this belated post. Here is the final part of TechIQ’s five-part countdown, highlighting 50 trends and takeaways from the Ubuntu Live conference in Portland, Oregon. Some of the items are closely related to earlier portions of the list. Here we go…
50-41: Part One of the List
40-31: Part Two of the List
30-21: Part Three of the List
20-11: Part Four of the List
10. Winning On Alfresco: Roughly 22 percent of Alfresco developer downloads occur to the Ubuntu platform, a dramatic increase from last year, according to Alfresco GM Matt Asay.
9. Don’t Betray Your Audience: One speaker conceded that he was nearly booed off stage during another open source conference. The reason: He used PowerPoint rather than OpenOffice for his presentation.
8. Two Unsung Heroes: Two small PC suppliers, ZaReason and System76, won praise for their early commitment to the Ubuntu movement.
7. Play to Your Strengths: Instead of competing head-on against Microsoft, several speakers suggested that the Ubuntu community needs to continue exploiting niche applications and collaboration to attack market voids left by Microsoft.
6. Printer Drivers: It sounds so basic. But printer drivers are the number one problem university professors seem to complain about when they’re using Ubuntu, according to several speakers.
5. Repeat Performance: Canonical feels pretty confident about its prospects and is already planning next year’s event.
4. Global Focus: Rather than playing regional favorites, Canonical is striving to enhance its localization, training and certification initiatives across the globe. Traditional closed-source software companies simply can’t complete with the global network of developers who are committed to tweaking code for use in hundreds of countries.
3. Novell Is Worse Off Than Expected: Sure, Novell has gained some momentum with corporate customers who embraced the Microsoft-Novell relationship. But imagine if the American Red Cross lost all of its volunteers. That could be the situation facing Novell if it doesn’t take steps to win back open source developers who despise the Microsoft deal. Throughout the event, Novell’s “betrayal” of the open source movement was raised by multiple speakers.
2. Small Business Push: Watch for Canonical to work with at least one major hardware developer to promote an integrated small business server package. The suite will likely be based on the LAMP software stack, The VAR Guy hears. One suggestion: Partner with Zimbra or another open source email provider on this project.
1. The Numbers Don’t Lie: Some nuggets of info worth repeating: Ubuntu now has 6 million to 12 million users and Canonical’s staff has doubled to 100 employees since January. Impressive growth, to be sure... oh if you search google for "linux" Ubuntu is on top! check it out here
Howto: Install Ubuntu on Windows 2000,XP,Vista


Wow, I just was searching google for ubuntu vs windows and ran across this application that installs Ubuntu right on top of windows, yea I think its pretty lame to install a Powerful operating system such as Ubuntu on top of windows which is slow/bloated as hell but it is possible.
From the siteWubi is an unofficial Ubuntu installer for Windows users that will bring you into the Linux world with a single click. Wubi allows you to install and uninstall Ubuntu as any other application. If you heard about Linux and Ubuntu, if you wanted to try them but you were afraid, this is for you.
Wubi is Safe
It does not require you to modify the partitions of your PC, or to use a different bootloader.
Wubi is Simple
Just run the installer, no need to burn a CD.
Wubi is Discrete
Wubi keeps most of the files in one folder, and If you do not like, you can simply uninstall it.
Wubi is Free
Wubi (like Ubuntu) is free as in beer and as in freedom. You will get this part later on, the important thing now is that it cost absolutely nothing, it is our gift to you...
How does Wubi work?
Wubi adds an entry to the Windows boot menu which allows you to run Linux. Ubuntu is installed within a file in the windows file system (c:\wubi\disks\system.virtual.disk), this file is seen by Linux as a real hard disk.
Is this running Ubuntu within a virtual environment or something similar?
No. This is a real installation, the only difference is that Ubuntu is installed within a file as opposed to being installed within its own partition. Thus we spare you the trouble to create a free partition for Ubuntu. And we spare you the trouble to have to burn a CD-Rom.
This istaller installs Ubuntu on a loopback file system located on your Windows partition, while making it bootable just like a real-deal Ubuntu install. In fact, it _is_ a real-deal Ubuntu install, albeit in a slightly unconventional manner. If you go glassy eyed at the word "loopback", don't worry.. it's just a fancy way of saying that your whole Ubuntu install is self-contained and stored in a single large file on your Windows drive.
Grab a copy of Wubi Here
Howto: Completely Transparent Shell on your Ubuntu desktop with Compiz Fusion
I will show how to create a conky'esque transparent shell using only gnome-terminal and Compiz-fusion. Check out the attached screenshots.

First create a new profile in gnome-terminal (Edit->Profiles->New), name it "trans". Set the following characteristics:
Cursor blinks: off
Show menubar: off
Initial title: trans
Dynamically-set title: Isn't displayed
Color scheme: Black on white
Transparent Background: on
Set the transparency down to "None"
The important part here is that now the gnome-terminal is gonna have the title trans. We can now target the gnome-terminal windows that are using trans profile from inside CompizConfig by using "title=trans".
Open CompizConfig (System->Preferences->CompizConfig). Make sure you have the regEx plugin enabled.
Go to the Window Decoration plugin and add "!title=trans" to the Decoration windows field. This will skip adding window borders to our trans terminals.
Go to the Window Rules plugin. Add "title=trans" to the following fields (This will turn the terminals into a widget-like windows):
In the Fixed Size Windows section click add. Use "title=trans" for the the Sized Window field and put the height and width you want for your shells.
Go to the Place Windows plugin, go to the Windows with fixed positions tab, in Windows with fixed positions click add. Put "title=trans" in Positioned Windows field and put x and y coordinates of the default position you want for your shell (top-left corner is 0,0). After they have loaded you can move them by Alt-Dragging them.
To run the transparent gnome-terminal use:gnome-terminal --window-with-profile=trans
dock: avant-window-navigator
widgets: conky
conky theme: http://ubuntuforums.org/showpost.php...&postcount=505
Ubuntu Running Slow?
Get the performance patchset! here on this site
Howto: Install Samba quickly and Easily Via Custom Scripts on Ubuntu
I found these scripts based off of a web tutorial on how to install and configure a file server via samba that i found here. I don't take credit for the tutorial just for the scripts. Feel free to edit these scripts and make them better. Just be sure to post the new ones.
Installation:
1. extract the samba scripts.
2. run installsamba.sh
3. run addusers.sh for each user you want to add
4. run addshares.sh for each folder you want to add
5. enjoy your new file server
Also I would like to make more scripts for other common tasks in Ubuntu that other people seem too lazy to make scripts for. I don't mean to sound like I don't appreciate his or her work, I would just like to see more scripts for installing things like the alsa driver. Let me know if there are any that are desperately needed and I would do my best.
Download scripts here
Howto: Securely Delete Files In Ext3 Via Nautilus Menu
This adds a menu which securely deletes files by overwriting them 25 times
install nautilus-actions via synaptic package manager
launch nautilus actions configuration
-->system--->preferences--->nautilus actions configuration
Add
Label = Shred
Path = shred
Parameters = -fuz %M
Click ok and exit
in terminal type killall nautilus
Viola!
A note for ext3 users from the shred manual:
CAUTION:
Note that shred relies on a very important assumption: that
the file system overwrites data in place. This is the traditional way
to do things, but many modern file system designs do not satisfy this
assumption. The following are examples of file systems on which shred
is not effective, or is not guaranteed to be effective in all file sys‐
tem modes:
In the case of ext3 file systems, the above disclaimer applies only in data=journal mode, which journals file data in addition to just metadata. In both the data=ordered (default) and data=writeback modes, shred works as usual.
Howto: Free Encrypted Online Storage for Ubuntu
For quite a while now I was looking for a solution, to store a backup of my boot partition (ubuntu server) online, since it took me about half a year to get the system configured the way I wanted it. Loosing it would definitely cause an attempted genocide. But I had two major concerns:
1: The costs. Why would I have to pay for something, that is already available in different forms. Yeah, services like S3 from amazon are affordable, but, why pay when you don't have to, right?
2: Security. I'm aware of the fact that there is no such thing as total security when you're somehow connected to the interwebs, but I don't wanna trust some firm, where I can't hunt down the sysadmin with a baseball bat, because he got into my backup files. I think you get the point.
So here is what I did.
Create a backup with tar, split it into 94MB files, encrypt them with my gpg key and upload them to rapidshare. Rapidshare will delete the files after 3 month, if you haven't accessed them, which sould be quite enough.
Let's have a look at the full backup script:#!/bin/bash
#create directory for this month full back in /home/saylar/backup/
mkdir /home/saylar/backup/`date '+%Y-%m'`
mkdir /home/saylar/backup/`date '+%Y-%m'`/full_backup/
#create a full backup for this month and split it into 94MB Files
tar cvj --listed-incremental /home/saylar/backup/`date '+%Y-%m'`/fullbackup.snar --exclude=/proc --exclude=/lost+found --exclude=/mnt --exclude=/sys --exclude=/home/saylar/backup / | split -d -b 90m - /home/saylar/backup/`date '+%Y-%m'`/full_backup/full_backup.tar.bz2.split
#encrypt the files with gpg
gpg --encrypt-files --batch --no-tty -r dummy@email.address /home/saylar/backup/`date '+%Y-%m'`/full_backup/*split*
#upload the files via rsupload script
for gpg in /home/saylar/backup/`date '+%Y-%m'`/full_backup/*gpg;
do /home/saylar/backup/rsupload.pl "$gpg";
done
#now move the file with Rapidsharelinks into corresponding directory
mv /home/saylar/backup/rsulres.txt /home/saylar/backup/`date '+%Y-%m'`/full_backup/
#delete gpg files after they were succesfully uploaded
rm -r /home/saylar/backup/`date '+%Y-%m'`/full_backup/*gpg
So, if you wanna do that, you have to do the following things:mkdir ~/backup
mkdir ~/backup/log
chmod a+x scriptname
sudo crontab -e
0 6 1 * * /home/saylar/backup/backup_full >> /home/saylar/backup/log/backup_full.log 2>&1
0 6 8,15,23,30 * * /home/saylar/backup/backup_incr_weekly >> /home/saylar/backup/log/backup_incr_weekly.log 2>&1
0 6 2,3,4,5,6,7,9,10,11,12,13,14,16,17,18,19,20,21,22,24,25,26,27,28,29,31 * * /home/saylar/backup/backup_incr_daily >> /home/saylar/backup/log/backup_incr_daily.log 2>&1
30 23 * * * /home/saylar/backup/mvlog > /dev/null
PS: I'm no programmer at all, so I know that some things could be done much nicer, but it works very well for me. If you have any suggestions, let me you know and I'll be happy to change it.
Sources:
Howto: Backup and restore your system!
Rapidshare Upload Script
GPG Tutorial
Download Backup script Here
Howto: Less typing in the command line
If your like me, a command line junky and you are tired of typing so much here is a simple quick and effective tip.
The BASH shell has several environment variables that can be manipulated. The PATH variable is well known. Another useful variable is CDPATH. As PATH is a list of search paths for commands, so is CDPATH a list of directories used as search path for the "cd" command.
Example: At one ftp server we serve a lot of software, including several of the most popular Linux distributions. The local path to these distributions involves a lot of typing:
defcon@ion:~$ cd /usit/ion/ftp/linux/
 defcon@ion:/usit/ion/ftp/linux$
From here, I can jump into "slackware/", "centos/", "debian/" and so on. But it's simpler when using CDPATH:
   defcon@ion:~$ export CDPATH="/usit/ion/ftp/linux"
defcon@ion:~$ cd slackware
  /usit/ion/ftp/linux/slackware
defcon@ion:/usit/ion/ftp/linux/slackware$
Nice huh?
An even lazier method (involving less typing) is to use alias:
defcon@ion:~$ alias s="cd /usit/ion/ftp/linux/slackware"
defcon@ion:~$ s
defcon@ion:/usit/ion/ftp/linux/slackware$
But then I have to create one alias for each directory. Oh the choices!
Howto: Setup Belkin Wireless G F5D7050 USB Network Adapter on Ubuntu
Basically the Belkin USB adapter aka "rt73" driver was a big pain in the ass when I first installed ubuntu, the thing is, it really isnt hard at all. Here is what I do, everytime I install ubuntu or compile another kernel.
Things you need
1. Ubuntu installed with usb adapter unplugged, yes unplugged!
2. Linux kernel headers from synaptic it looks like /linux-headers-*kernel version*
3. Build-essential packages from synaptic or apt-get build-essential
4. Rt73 Serialmonkey Drivers.
5. I dont like network-manager-gnome, it doesnt work properly with our card so I removed it, it may conflict with your setup. I use Rutilt and I supplied the latest Rutilt v0.15 in .deb made with check install later in this post.
This is all you do
wget http://rt2x00.serialmonkey.com/rt73-cvs-daily.tar.gz
tar zxvf rt73-cvs-daily.tar.gz
cd rt73* <-- extracted dir
cd M* <-- Modules dir
make
strip -S rt73.ko
make install
echo rt73 >>/etc/modules
Now Plug in your Belkin USB dongle.
modprobe rt73
Then type iwconfig and it will be listed as wlan0 or wlan*
If you do not know how to setup your /etc/network/interfaces file you can use a utility called Rutilt which I use to replace gnome-network-manager
How to install Rutiltwget http://io.storm.googlepages.com/rutiltv0.15_20070805-1_i386.deb
dpkg -i rutiltv0.15_20070805-1_i386.deb
Press Alt F2 after install and type in rutilt to run this, u can add this to gnome-session-properties for autostart
If for some reason this .deb doesnt work for you grab rutilt src from
http://cbbk.free.fr/bonrom/
Examples How to properly setup /etc/network/interfaces for WPA with your Belink USB:
# WORKING STATIC AES/WPA CONFIG
auto wlan0
iface wlan0 inet static
address 192.168.2.3
netmask 255.255.255.0
gateway 192.168.2.1
pre-up ifconfig wlan0 down
pre-up macchanger -A wlan0 # this changes my mac every time I connect to sp00f wifi networks
pre-up ifconfig wlan0 up
pre-up iwconfig wlan0 essid MYROUTERNAMEHERE
pre-up iwconfig wlan0 mode managed
pre-up iwpriv wlan0 set Channel=11 #channel where Access point is set, can be set to "auto"
pre-up iwpriv wlan0 set AuthMode=WPAPSK
pre-up iwpriv wlan0 set EncrypType=AES
pre-up iwpriv wlan0 set WPAPSK="wpa password from wpa_passphrase"
pre-up iwpriv wlan0 set TxRate=0
mtu 1454
# WORKING DYNAMIC AES/WPA CONFIG
auto wlan0
iface wlan0 inet dhcp
pre-up ifconfig wlan0 up
pre-up iwconfig wlan0 essid MYROUTERNAMEHERE
pre-up iwconfig wlan0 mode managed
pre-up iwpriv wlan0 set Channel=11 #channel where Access point is set, can be set to "auto"
pre-up iwpriv wlan0 set AuthMode=WPAPSK
pre-up iwpriv wlan0 set EncrypType=AES
pre-up iwpriv wlan0 set WPAPSK=Password_from_wpa_passphrase_via_cmd_line
pre-up iwpriv wlan0 set TxRate=0
mtu 1454
# static configuration for static belkins wep
auto wlan0
iface wlan0 inet static
address 192.168.2.3
netmask 255.255.255.0
gateway 192.168.2.1
wireless-essid ROUTERER ESSID
wireless-key yourhexkeyhere
# dynamic working config for dynamic belkins wep
auto wlan0
iface wlan0 inet dhcp
wireless-essid ESSID
wireless-key hexkeyhere
Howto: Protect Your Ubuntu Machine by Setting up tripwire
After you have disabled all the unneeded services on your system, what remains is a core set of connections and programs that you want to keep. However, you are not finished yet: You need to clamp down your wireless network, lock your server physically, and put scanning procedures in place (such as Tripwire and promiscuous mode network monitors).
Securing a Wireless Network
Because wireless networking has some unique security issues, those issues deserve a separate discussion here.
Wireless networking, although convenient, can be very insecure by its very nature because transmitted data (even encrypted data) can be received by remote devices. Those devices could be in the same room; in the house, apartment, or building next door; or even several blocks away. Extra care must be used to protect the actual frequency used by your network. Great progress has been made in the past couple of years, but the possibility of a security breech is increased when the attacker is in the area and knows the frequency on which to listen. It should also be noted that the encryption method used by more wireless NICs is weaker than other forms of encryption (such as SSH) and should not be considered as part of your security plan.
TipAlways use OpenSSH-related tools, such as ssh or sftp, to conduct business on your wireless LAN. Passwords are not transmitted as plain text, and your sessions are encrypted.
The better the physical security is around your network, the more secure it will be (this applies to wired networks as well). Keep wireless transmitters (routers, switches, and so on) as close to the center of your building as possible. Note or monitor the range of transmitted signals to determine whether your network is open to mobile network sniffingnow a geek sport known as war driving. (Linux software is available at http://sourceforge.net/project/showfiles.php?group_id=57253.) An occasional walk around your building not only gives you a break from work, but can also give you a chance to notice any people or equipment that should not be in the area.
Keep in mind that it takes only a single rogue wireless access point hooked up to a legitimate network hub to open access to your entire system. These access points can be smaller than a pack of cigarettes, so the only way to spot them is to scan for them with another wireless device.
Passwords and Physical Security
The next step toward better security is to use secure passwords on your network and ensure that users use them as well. For somewhat more physical security, you can force the use of a password with the LILO or GRUB bootloaders, remove bootable devices such as floppy and CD-ROM drives, or configure a network-booting server for Ubuntu. This approach is not well supported or documented at the time of this writing, but you can read about one way to do this in Brieuc Jeunhomme's Network Boot and Exotic Root HOWTO, available at http://www.tldp.org/HOWTO/Network-boot-HOWTO/
Also, keep in mind that some studies show that as much as 90% of network break-ins are by current or former employees. If a person no longer requires access to your network, lock out access or, even better, remove the account immediately. A good security policy also dictates that any data associated with the account first be backed up and retained for a set period of time to ensure against loss of important data. If you are able, remove the terminated employee from the system before he leaves the building.
Finally, be aware of physical security. If a potential attacker can get physical access to your system, getting full access becomes trivial. Keep all servers in a locked room, and ensure that only authorized personnel are given access to clients.
Configuring and Using Tripwire
Tripwire is a security tool that checks the integrity of normal system binaries and reports any changes to syslog or by email. Tripwire is a good tool for ensuring that your binaries have not been replaced by Trojan horse programs. Trojan horses are malicious programs inadvertently installed because of identical filenames to distributed (expected) programs, and they can wreak havoc on a breached system.
Ubuntu does not include the free version of Tripwire, but it can be used to monitor your system. To set up Tripwire for the first time, go to http://www.tripwire.org, and then download and install an open-source version of the software. After installation, run the twinstall.sh script (found under /etc/tripwire) as root like so:
$ sudo /etc/tripwire/twinstall.sh
----------------------------------------------
The Tripwire site and local passphrases are used to
sign a variety of files, such as the configuration,
policy, and database files.
Passphrases should be at least 8 characters in length
and contain both letters and numbers.
See the Tripwire manual for more information.
----------------------------------------------
Creating key files...
(When selecting a passphrase, keep in mind that good passphrases typically
have upper and lower case letters, digits and punctuation marks, and are
at least 8 characters in length.)
Enter the site keyfile passphrase:
You then need to enter a password of at least eight characters (perhaps best is a string of random madness, such as 5fXkc4ln) at least twice. The script generates keys for your site (host) and then asks you to enter a password (twice) for local use. You are then asked to enter the new site password. After following the prompts, the (rather extensive) default configuration and policy files (tw.cfg and tw.pol) are encrypted. You should then back up and delete the original plain-text files installed by Ubuntu.
To then initialize Tripwire, use its --init option like so:$ sudo tripwire --init
Please enter your local passphrase:
Parsing policy file: /etc/tripwire/tw.pol
Generating the database...
*** Processing Unix File System ***
....
Wrote database file: /var/lib/tripwire/shuttle2.twd
The database was successfully generated.
Note that not all the output is shown here. After Tripwire has created its database (which is a snapshot of your file system), it uses this baseline along with the encrypted configuration and policy settings under the /etc/tripwire directory to monitor the status of your system. You should then start Tripwire in its integrity checking mode, using a desired option. (See the TRipwire manual page for details.) For example, you can have Tripwire check your system and then generate a report at the command line, like so:
# tripwire -m c
No output is shown here, but a report is displayed in this example. The output could be redirected to a file, but a report is saved as /var/lib/tripwire/report/hostname-YYYYMMDD-HHMMSS.twr (in other words, using your host's name, the year, the month, the day, the hour, the minute, and the seconds). This report can be read using the twprint utility, like so:
# twprint --print-report -r \
/var/lib/tripwire/report/shuttle2-20020919-181049.twr | less
Other options, such as emailing the report, are supported by Tripwire, which should be run as a scheduled task by your system's scheduling table, /etc/crontab, on off-hours. (It can be resource intensive on less powerful computers.) The Tripwire software package also includes a twadmin utility you can use to fine-tune or change settings or policies or to perform other administrative duties.
Devices
Do not ever advertise that you have set a NIC to promiscuous mode. Promiscuous mode (which can be set on an interface by using ifconfig's promisc option) is good for monitoring traffic across the network and can often allow you to monitor the actions of someone who might have broken into your network. The tcpdump command also sets a designated interface to promiscuous mode while the program runs; unfortunately, the ifconfig command does not report this fact while tcpdump is running!
Do not forget to use the right tool for the right job. Although a network bridge can be used to connect your network to the Internet, it would not be a good option. Bridges have almost become obsolete because they forward any packet that comes their way, which is not good when a bridge is connected to the Internet. A router enables you to filter which packets are relayed.


