Howto: Restore All Installed packages in Ubuntu Hardy Heron and to a New machine
Ever forget what you had installed and find yourself at a fresh ubuntu install thinking to yourself... Damn now I gotta open up synaptic and search for everything I had... Well fortunately you dont need to do that. With this easy howto you can also restore all your packages that were installed by simply creating a package list and uninstalling every application installed after the list was made.
Lets get started shall we?
The following command creates a list of all the installed packages at the present time:sudo dpkg --get-selections > /etc/package.selections
Now we created our package list and we can copy this list to a new ubuntu computer and install the same packages in the list to the new machine or, restore the packages to the time you created the package list:sudo dpkg --set-selections < /etc/package.selections && apt-get dselect-upgrade
The above command will uninstall all packages installed after you created your restore list.
Howto: Install VirtualBox in Ubuntu Hardy Heron with USB Support in 5 easy Steps!
 *update* New Verson of Virtualbox Just released! Click Here!
When I last checked Virtualbox did not update their repositories for Hardy Heron, its not a problem, their is a hardy package without a repository. I have created a howto last year on howto setup VirtualBox completely and to seamlessly integrate windows xp into your ubuntu desktop here
So lets install the brand new virtualbox package for Hardy Heron...
Lets Install the essential build utilities so the vbox kernel module builds.sudo apt-get install build-essential linux-headers-`uname -r`
Install i386 VirtualBox without repository:wget http://www.virtualbox.org/download/1.5.6/virtualbox_1.5.6-28266_Ubuntu_hardy_i386.deb ; sudo dpkg -i virtualbox_1.5.6-28266_Ubuntu_hardy_i386.deb
Install amd64 Virtualbox without repository:wget http://www.virtualbox.org/download/1.5.6/virtualbox_1.5.6-28266_Ubuntu_hardy_amd64.deb ; sudo dpkg -i virtualbox_1.5.6-28266_Ubuntu_hardy_amd64.deb
Check Here for updated Virtualbox Packages since the repository isnt added yet
Alternate install with Gutsy repository as some people have suggested works fine, just copy/paste these exact commands into the terminal:sudo sh -c 'echo "# VirtualBox repository for Ubuntu Gutsy
deb http://www.virtualbox.org/debian gutsy non-free" \
> /etc/apt/sources.list.d/gutsy-virtualbox.list'
wget http://www.virtualbox.org/debian/innotek.asc -O- | sudo apt-key add -
sudo apt-get update
sudo apt-get -y install virtualbox
Now you Must add your self to the vboxusers group:sudo adduser $USER vboxusers
Adding user `ionstorm' to group `vboxusers' ...
Adding user ionstorm to group vboxusers
Done.
Setup VirtualBox USB Support:
USB is disabled by default, so you'll probably want to enable it. Otherwise you'll get an error when you go into the "Settings" of your virtual machine. To correct this, you'll need to edit the mountdevsubfs.sh file:sudo gedit /etc/init.d/mountdevsubfs.sh
You'll see a block of code that looks like this:#
# Magic to make /proc/bus/usb work
#
#mkdir -p /dev/bus/usb/.usbfs
#domount usbfs "" /dev/bus/usb/.usbfs -obusmode=0700,devmode=0600,listmode=0644
#ln -s .usbfs/devices /dev/bus/usb/devices
#mount --rbind /dev/bus/usb /proc/bus/usb
Now uncomment the last 4 lines above to look like this:#
# Magic to make /proc/bus/usb work
#
mkdir -p /dev/bus/usb/.usbfs
domount usbfs "" /dev/bus/usb/.usbfs -obusmode=0700,devmode=0600,listmode=0644
ln -s .usbfs/devices /dev/bus/usb/devices
mount --rbind /dev/bus/usb /proc/bus/usb
Ok now logoff, then log back in so the vbox driver see's you are logged in to the vboxusers group.
If the above doesnt work try rebooting, if that doesnt enable usb you can try this:
Grab the vboxusers group id:grep vbox /etc/group
vboxusers:x:124:ionstorm
Edit the fstab with the group id # in bold:sudo gedit /etc/fstab
Append this to the fstab then save/exit:## usbfs is the USB group in fstab file:
none /proc/bus/usb usbfs devgid=124,devmode=664 0 0
Now lets edit the mountkernfs.sh file with the gid in bold:sudo gedit /etc/init.d/mountkernfs.sh
Paste the 2 lines below above the line: "# Mount spufs, if Cell Broadband processor is detected"## Mount the usbfs for use with Virtual Box
domount usbfs usbdevfs /proc/bus/usb -onoexec,nosuid,nodev,devgid=124,devmode=664
You may not need to reboot, try doing:sudo /etc/init.d/mountkernfs.sh
If not, reboot, and virtualbox should detect your usb devices!
You can follow my directions here to learn how to integrate Windows XP into your desktop!
Checkout the Official VirtualBox User Manual Here
Howto: Install Metasploit 3.1 svn in Ubuntu Hardy Heron
The Metasploit Framework is a development platform for creating security tools and exploits. The framework is used by network security professionals to perform penetration tests, system administrators to verify patch installations, product vendors to perform regression testing, and security researchers world-wide. The framework is written in the Ruby programming language and includes components written in C and assembler.
The framework consists of tools, libraries, modules, and user interfaces. The basic function of the framework is a module launcher, allowing the user to configure an exploit module and launch it at a target system. If the exploit succeeds, the payload is executed on the target and the user is provided with a shell to interact with the payload.
This is a tool that I pentest my lan with and can be used to hack remote computers/networks or whatever, I will show you how to get this setup and installed in Ubuntu Hardy very easily:
First lets install the Dependencies:sudo apt-get install build-essential ruby libruby rdoc libyaml-ruby libzlib-ruby libopenssl-ruby libdl-ruby libreadline-ruby libiconv-ruby rubygems sqlite3 libsqlite3-ruby libsqlite3-dev irb subversion
Lets grab rubygems and install it because the ubuntu package is crap.wget http://rubyforge.org/frs/download.php/11289/rubygems-0.9.0.tgz
tar -xvzf rubygems-0.9.0.tgz
cd rubygems-0.9.0
sudo ruby setup.rb
sudo gem install -v=1.1.6 rails
Now at last we can grab metasploit:svn co http://metasploit.com/svn/framework3/trunk/ metasploit
Lets load cd to the metasploit dir, and update it, I do this before executing every time.cd metasploit
Update Metasploit exploits/modules/payloads/packagesvn up
Lets Startup Metasploit./msfconsole
Learn more about metasploit here
Howto: Easily Setup DVD Playback in Ubuntu with 1 Click
Here is the easiest way to get dvd playback in Ubuntu Hardy Heron!
Open the Terminal and paste these commands:sudo wget http://www.medibuntu.org/sources.list.d/hardy.list -O /etc/apt/sources.list.d/medibuntu.listsudo apt-get update && sudo apt-get install medibuntu-keyring apturl && sudo apt-get update
Click here to install DVD playback from your browser!
If the above does not work simply:sudo apt-get install libdvdcss2
Now startup your favorite media player and it *should decrypt the dvd* :)
Howto: Awesome Opensource MilkDrop Winamp Music Visualizations for Ubuntu Linux! (475 visuals!)
Tired of lame GOOM! visualizations in Ubuntu and want something pretty tight? Check out projectM!
A week or 2 ago I told people at this post that I would help port over winamp visualizations over to ubuntu and I have finally accomplished that task and created a .deb package for easy installation! Please note that projectm doesnt currently work with amarok or any music player at the moment so you can simply run projectM before/after/during what your listening to and the effects will be amazing, this will work for any sounds and can even be configured to visualize music on the lan/wan!
Howto install:wget http://ubuntu-debs.googlecode.com/files/projectm_1.1-rev-980-2_i386.debsudo dpkg -i projectm_1.1-rev-980-2_i386.deb
*recommended but optional* *updated* Download my 475 presets and extract to preset directorycd ~ ; wget http://ubuntu-debs.googlecode.com/files/projectm_presets.tar.gztar zxvf projectm_visuals.tar.gz
When you download a preset package, you will need to extract all the files to a directory where projectM can find it. We put ours in ~/projectM/presets and then we'll create a symbolic link to our preset directory so projectM can see itcd /usr/share/projectM/presets && sudo ln -s ~/projectm/presets/ others
Howto Run:
Goto: Applications->Sound and Video->projectM-pulseaudio
Usage:Controls (these are listed in the menu under "hotkeys":
m - brings up a menu
f - toggles fullscreen on/off
l - "locks" to a particular preset
y - toggles shuffle mode
n - next preset
p - previous preset
r - selects random preset
F1 - Help menu
F2 - Toggles song title on/off (doesn't work in libvisual or pulseaudio as far as I can tell)
F3 - Toggle preset name on/off
F4 - Toggle rendering info on/off
F5 - Shows fps
How to load visualizations:
Simply click the load preset button and select the presets in the correct directory you want to see. You can create a visualization playlist as well, its easy.
Other info:
ProjectM uses pulseaudio, it can do everything that pulseaudio can do. In the menu, you can select which pulseaudio source to use as the music input to the visualizations. This includes network sound resources. You CAN use projectM as a visualizer for the music ANOTHER PC is playing!
Adding too many presets may crash projectm, so load only a hundred or so at a time, or experiment on how many can be loaded at once
You can find more visualizations here
Compile from svn src howto here
ProjectM Developers Page here
Howto: Setup Compiz Fusion with open source ati radeon drivers
Older ATI cards have been blacklisted for Compiz Fusion because of a bug in the driver, but there is an easy workaround for many cards that use the open source ati drivers. Radeon 9500 are the oldest cards to support the restricted "fglrx" drivers, so everything older requires the open source drivers to function properly.
First edit the launcher for Compiz Fusion:gksudo gedit /usr/bin/compiz
Near the top, add the lineSKIP_CHECKS="yes"
I added it under VERBOSE="yes"
You may also need to install the Compiz settings manager program that you can access from System->Preferences->Advanced Desktop Effect Settings | 1-click install or:sudo apt-get install compizconfig-settings-manager
You can now load Compiz Fusion withcompiz --replace
and revert to Metacity (the basic window manager) withmetacity --replace
I suggest making launchers in a panel for this.
Remember that this is a workaround and may not work for everybody. If you have further problems, you should consider running a forum search and then posting on one of the main support forums if you still need help.
For the record, my card is an ATI Mobility Radeon 9000.
This Article was found here
HOWTO: Install btnx for better mouse control in Ubuntu
When I installed Hardy, I forgot to copy my awesome xorg.conf which held the configuration to enable all 12 buttons of my Logitech MX1000.
Lo and behold, a new method of configuring it has come about, albeit it was around prior to Gutsy.
btnx is the work of Olli Salonen. The program runs as a daemon, catching mouse events and turning them into either key presses or proper mouse events which the system can interpret. This eases the configuration one must do in order to enjoy the full potential of the high-end Logitech mice—a potential which, in my opinion, Windows cannot reach.
The installation process for btnx is pretty easy.
Read the full article here
Easily Upgrade to Ubuntu Hardy Heron 8.04 LTS
Now is the best time to upgrade, and upgrading is a breeze, sit back relax, and issue the following commands!
Upgrade from 7.10 to 8.04 LTS
Press Alt-F2 and type update-manager -d
Click the Check button to check for new updates.
A message will appear informing you of the availability of the new release.
Click Upgrade.
Follow the on-screen instructions.

Command line upgrade:
sudo apt-get update && sudo apt-get dist-upgradeDownload the iso:
http://releases.ubuntu.com/8.04/
Howto: Loop Movie, Video, and Display Screensaver as Desktop Wallpaper in Ubuntu Linux
Want to loop a video clip or movie on your desktop? I did and found a nice little tool that does just that! Check out this easy howto
First lets grab some essential building libraries via the terminal: Applications->Accessories->Terminalsudo apt-get install build-essential libx11-dev x11proto-xext-dev libxrender-dev libxext-dev cvs
Now lets Install xwinwrap:cvs -d :pserver:anoncvs@cvs.freedesktop.org:/cvs/xapps co xwinwrap
cd xwinwrap
make
sudo cp xwinwrap /usr/bin
Now lets start our video/movie as the Desktop Wallpaper!
First find a video/movie you would like to set as your backround and issue this command:xwinwrap -ni -fs -s -st -sp -b -nf -- mplayer -wid WID -nosound "Steal This Film II.Xvid.avi" -loop 0
Now everything should be working fine, if you would like sound, remove -nosound
You can also display Screensavers as your background:nice -n 15 ./xwinwrap -ni -o 0.20 -fs -s -sp -st -b -nf -- /usr/lib/xscreensaver/glmatrix -root -window-id WID
Credit for the screen saver hack goes out to wayne@fsckin
Tweak and optimize, and increase Ubuntu Hardy Heron Boot and Application Startup times dramatically!
Here I will share some methods on tweaking and optimizing your ubuntu install that I have learned over the years tweaking linux. This is small and sweet, down to the point and can dramatically speed up your system.
First lets tweak our directory structure so our Computer can find/seek files faster:
What we'll need is a Ubuntu Gutsy+ LiveCD and boot it up, and right click unmount all the drives mounted in nautilus via places. Then Open up a Terminal: Applications->Accessories->Terminal
Lets Sudo Root:sudo -s
Then lets check which drives we got to optimize:df -h
Example:/dev/sda3 154G 145G 1.6G 99% /media/sda3
/dev/sda4 99G 61G 39G 62% /media/sda4
Ok great, we got a list of our drives to optimize so lets get to work:e2fsck -fD /dev/sda3
choose y for yes and optimize your drive, then continue to the next drive once finished
If you need to you can RTFM on e2fsck: -D Optimize directories in filesystem. This option causes e2fsck
to try to optimize all directories, either by reindexing them if
the filesystem supports directory indexing, or by sorting and
compressing directories for smaller directories, or for filesys‐
tems using traditional linear directories.
Ok now that the drives are optimized the system should be more responsive. So were finished with the liveCD portion of this howto, so reboot, and remove your liveCD.
Ok the next tweak I dont use completely, I only use noatime in my fstab and I dont use writeback mode because I sometimes have power outages and dont want to risk dataloss. So changing to writeback is dangerous but much faster if you do not have to worrie about dataloss, crashes, lockups, forced reboot/shutdowns.
Ok now you can Use data=writeback and noatime when mounting ext3 partitions in /etc/fstab:sudo gedit /etc/fstab
Here is an example of what I have in my fstab:UUID=3eb414ba-5198-4c1f-9e3d-e91675329f83 / ext3 defaults,noatime,errors=remount-ro 0 0
Lets change this to:UUID=3eb414ba-5198-4c1f-9e3d-e91675329f83 / ext3 defaults,data=writeback,noatime,errors=remount-ro 0 0
Ok now lets tune our drive for writeback mode:sudo tune2fs -o journal_data_writeback /dev/sda1
For reference you can RTFM:writeback
Data ordering is not preserved - data may be written into
the main file system after its metadata has been commit‐
ted to the journal. This is rumoured to be the highest-
throughput option. It guarantees internal file system
integrity, however it can allow old data to appear in
files after a crash and journal recovery.
noatime
Do not update inode access times on this file system
(e.g, for faster access on the news spool to speed up
news servers).
Ok now lets install preload to optimize bootspeed and application startup time, I have an alternate tutorial here explaining how preload works:sudo apt-get install preload
Ok you can also tune the swap/memory usage by optimizing swappiness, I have provided a more in depth tutorial explaining what it does here So lets tweak our swappiness:sudo gedit /etc/sysctl.conf
If you have a lot of memory and succeed in not using swap at all and want swap to be used less then add this line:vm.swappiness=0
If your computer has little memory and needs to swap add this line instead:vm.swappiness=100
You may want to experiment with swapiness by changing it between 0 - 100
Last but not least you may want to profile your boot, what this does is, executes the readahead daemon to readahead files that you use every boot like drivers/gdm/kde/X, this is easy, on reboot, press esc to enter grub then find the kernel line:/boot/vmlinuz-2.6.24-16-generic root=UUID=3eb414ba-5198-4c1f-9e3d-e91675329f83 ro splash=verbose vga=794
Press e once its selected then append profile after this line like this:/boot/vmlinuz-2.6.24-16-generic root=UUID=3eb414ba-5198-4c1f-9e3d-e91675329f83 ro splash=verbose vga=794 profile
Then Press enter then "b" to boot up, what this will do is learn what files load every boot up and read them in advance every boot up. This will temporarily disable preload so once it finishes profiling and you are at a login terminal, reboot again and your system should startup/boot faster, and preload will preload applications and important libraries that you frequently access.
I hope this helps others enjoy Ubuntu Linux more, this took me 5 minutes to create, so let me know if I need to explain this a little better.
Have any other tweaks to add to this list? I'll give you credit.
Tweak Gnome Startup added by defcon @ 10:00 AM
You may also want to remove unnecessary applications starting up that gnome executes by opening Session Preferences via: System->Preferences->Sessions
Click on StartUp Programs
I disabled Bluetooth manager because I do not use bluetooth, you may want to as well.
I have disabled check for new hardware drivers because I do that via synaptic
I have disabled network manager because I use /etc/network/interfaces only and apt-get remove network-manager network-manager-gnome if you do not need it
I have disabled Print Queue Applet because I dont print on this computer
I also disabled Visual Assistance because I do not need assistance
You may find other things you may want to disable as well to speed up gnome startup
Howto: Harden the Ubuntu Linux Kernel with sysctl
I ran across a nice sysctl.conf file that will help secure your computer and prevent many different attacks on your computer like Man In the Middle Attacks, Syn attacks, source routing scans/attacks, spoofing protection/logging, and many others, read below.
Lets Harden our kernel:sudo gedit /etc/sysctl.conf
Now lets paste the following example below then ctrl-s save and exit
After you make the changes to the file lets apply the changes without a reboot:sysctl -p
sysctl -w net.ipv4.route.flush=1
Example:# Kernel sysctl configuration file for Red Hat Linux
#
# For binary values, 0 is disabled, 1 is enabled. See sysctl(8) and
# sysctl.conf(5) for more details.
# Controls IP packet forwarding
net.ipv4.ip_forward = 0
# Controls source route verification
net.ipv4.conf.default.rp_filter = 1
# Controls the System Request debugging functionality of the kernel
kernel.sysrq = 0
# Controls whether core dumps will append the PID to the core filename.
# Useful for debugging multi-threaded applications.
kernel.core_uses_pid = 1
#Prevent SYN attack
net.ipv4.tcp_syncookies = 1
net.ipv4.tcp_max_syn_backlog = 2048
net.ipv4.tcp_synack_retries = 2
# Disables packet forwarding
net.ipv4.ip_forward=0
# Disables IP source routing
net.ipv4.conf.all.accept_source_route = 0
net.ipv4.conf.lo.accept_source_route = 0
net.ipv4.conf.eth0.accept_source_route = 0
net.ipv4.conf.default.accept_source_route = 0
# Enable IP spoofing protection, turn on source route verification
net.ipv4.conf.all.rp_filter = 1
net.ipv4.conf.lo.rp_filter = 1
net.ipv4.conf.eth0.rp_filter = 1
net.ipv4.conf.default.rp_filter = 1
# Disable ICMP Redirect Acceptance
net.ipv4.conf.all.accept_redirects = 0
net.ipv4.conf.lo.accept_redirects = 0
net.ipv4.conf.eth0.accept_redirects = 0
net.ipv4.conf.default.accept_redirects = 0
# Enable Log Spoofed Packets, Source Routed Packets, Redirect Packets
net.ipv4.conf.all.log_martians = 1
net.ipv4.conf.lo.log_martians = 1
net.ipv4.conf.eth0.log_martians = 1
# Disables IP source routing
net.ipv4.conf.all.accept_source_route = 0
net.ipv4.conf.lo.accept_source_route = 0
net.ipv4.conf.eth0.accept_source_route = 0
net.ipv4.conf.default.accept_source_route = 0
# Enable IP spoofing protection, turn on source route verification
net.ipv4.conf.all.rp_filter = 1
net.ipv4.conf.lo.rp_filter = 1
net.ipv4.conf.eth0.rp_filter = 1
net.ipv4.conf.default.rp_filter = 1
# Disable ICMP Redirect Acceptance
net.ipv4.conf.all.accept_redirects = 0
net.ipv4.conf.lo.accept_redirects = 0
net.ipv4.conf.eth0.accept_redirects = 0
net.ipv4.conf.default.accept_redirects = 0
# Disables the magic-sysrq key
kernel.sysrq = 0
# Modify system limits for Ensim WEBppliance
fs.file-max = 65000
# Decrease the time default value for tcp_fin_timeout connection
net.ipv4.tcp_fin_timeout = 15
# Decrease the time default value for tcp_keepalive_time connection
net.ipv4.tcp_keepalive_time = 1800
# Turn off the tcp_window_scaling
net.ipv4.tcp_window_scaling = 0
# Turn off the tcp_sack
net.ipv4.tcp_sack = 0
# Turn off the tcp_timestamps
net.ipv4.tcp_timestamps = 0
# Enable TCP SYN Cookie Protection
net.ipv4.tcp_syncookies = 1
# Enable ignoring broadcasts request
net.ipv4.icmp_echo_ignore_broadcasts = 1
# Enable bad error message Protection
net.ipv4.icmp_ignore_bogus_error_responses = 1
# Log Spoofed Packets, Source Routed Packets, Redirect Packets
net.ipv4.conf.all.log_martians = 1
# Set maximum amount of memory allocated to shm to 256MB
kernel.shmmax = 268435456
# Improve file system performance
vm.bdflush = 100 1200 128 512 15 5000 500 1884 2
# Improve virtual memory performance
vm.buffermem = 90 10 60
# Increases the size of the socket queue (effectively, q0).
net.ipv4.tcp_max_syn_backlog = 1024
# Increase the maximum total TCP buffer-space allocatable
net.ipv4.tcp_mem = 57344 57344 65536
# Increase the maximum TCP write-buffer-space allocatable
net.ipv4.tcp_wmem = 32768 65536 524288
# Increase the maximum TCP read-buffer space allocatable
net.ipv4.tcp_rmem = 98304 196608 1572864
# Increase the maximum and default receive socket buffer size
net.core.rmem_max = 524280
net.core.rmem_default = 524280
# Increase the maximum and default send socket buffer size
net.core.wmem_max = 524280
net.core.wmem_default = 524280
# Increase the tcp-time-wait buckets pool size
net.ipv4.tcp_max_tw_buckets = 1440000
# Allowed local port range
net.ipv4.ip_local_port_range = 16384 65536
# Increase the maximum memory used to reassemble IP fragments
net.ipv4.ipfrag_high_thresh = 512000
net.ipv4.ipfrag_low_thresh = 446464
# Increase the maximum amount of option memory buffers
net.core.optmem_max = 57344
# Increase the maximum number of skb-heads to be cached
net.core.hot_list_length = 1024
## DO NOT REMOVE THE FOLLOWING LINE!
## nsobuild:20051206
The above script was found here
Is there any other sysctl settings worth mentioning for hardening?
Free Up Cache Memory in Linux
In the past, I've been forced to do ridiculous things like cat a file larger than available RAM to /dev/null and edit gigabyte files which flood my cache with this data. Luckily, Linux kernels 2.6.16 and newer provide a mechanism to clear the inode, page, and dentry caches on demand avoiding all this headache. All you have to do is echo a value to the proc filesystem, and you're done.
To use /proc/sys/vm/drop_caches, just echo a number to it.
To free pagecache:echo 1 > /proc/sys/vm/drop_caches
To free dentries and inodes:echo 2 > /proc/sys/vm/drop_caches
To free pagecache, dentries and inodes:echo 3 > /proc/sys/vm/drop_caches
As this is a non-destructive operation and dirty objects are not freeable, the user should run "sync" first!
This was originally found @ http://www.linuxinsight.com/proc_sys_vm_drop_caches.html
Tweak Page Cache in Ubuntu Linux
Here I will provide you with some information to help you decide exactly how you would like to tweak your system. I have seen many sites with the swappiness tweak for linux without any documentation on what it does, so I'll try my best to explain this in a simple way.
If you want linux to use as little memory as possible for caching files, and as much memory as possible for processes, and only swap when the memory used by processes is more than the physical memory set swappiness to 0, instead of 60. Users who would like to never see application memory swapped out can set swappiness to zero. This setting uses ram efficently and pretty much ignores using swap until it absolutely needs to like if your running 10 openoffice's and a few firefox windows and some multimedia applications, it will be forced to swap, thats the only way it will. Unfortunately it flushes the applications from memory when you load a new one so you will notice a slower restart time when reloading the application
If you run allot of memory intensive applications like firefox, amarok, and openoffice all the time, you may want to set swappiness to 100 because it will swap more to disk when your current processes run out of physical memory. I noticed that everything was a bit more responsive with this running many programs at once, like when I close firefox and load up xChat then re-open firefox, it loaded a bit quicker since it was swapped. You can take advantage of this setting if you have a fast extra hard drive or a fast usb flash drive which you can use as swap. I have provided a readyboost for linux howto here
Lets get to tweak'nsudo gedit /etc/sysctl.conf
To disable swapping application memory add the line:vm.swappiness=0
To Swap more application data to disk when ram is exhaustedvm.swappiness=100
Basically what I would do is experiment with this setting and see what works best when you load up plenty of applications you use daily because leaving it at the default, 0, or 100 may not be the best option.
Please let us all know your specs and what setting works best for you.
Introducing PyTube YouTube leecher & audio/video encoder for Mobile Devices & More
What is PyTube? Easy Interface Unlimited Downloads How to install PyTube:
PyTube is a another kick-ass application that hasnt gotten enough spotlight, it completely rocks, check out some of its features:
Search & Leech Videos From Youtube
Leech Videos from Other Video sites
Re-Encode Videos to iPhone/iPod/3gp/mp4/ogm/mpg/gif/amv
Insert Audio into Video
Generate Ringtones
Merge multiple Videos together
Resize Videos for Ipods->High Definition
Rotate videos
Construct a List of all your Videos to share with friends
Integrated Search
Multimedia Tools

Local Multimedia Encoding
Click System->Administration and then open up software sources
Click Add and add:deb http://www.bashterritory.com/pytube/releases /
Reload then click here to install
or sudo apt-get install pytube
Once installed access PyTube via Applications->Sound & Video->PyTube Multimedia Converter
Have fun
More information from the elite authors site here
Save Streaming Videos in Mplayer in 4 Easy Steps
1. Copy the url of the streaming video mms://etc... or http://...
2. Open up a terminal.
3. mplayer -dumpstream -dumpfile stream_video_name.wmv mms://etc...
4. Wait for the stream dump.
Have any others tools worth mentioning?
Original Content found here
Get your fingerprint reader to work in Ubuntu
Project fprint homepage: http://reactivated.net/fprint/wiki/Main_Page
Packages for fprint: http://www.madman2k.net/comments/105
The fprint project aims to plug a gap in the Linux desktop: support for consumer fingerprint reader devices.
Previously, Linux support for such devices has been scattered amongst different projects (many incomplete) and inconsistent in that application developers would have to implement support for each type of fingerprint reader separately. For more information on where we came from, see the project history page.
We're trying to change that by providing a central system to support all the fingerprint readers we can get our hands on. The software is open source and in the long term we're shooting for adoption by distributions, integration into common desktop environments, etc.
Note: These instructions are intended for Ubuntu Hardy. I have not personally tried this on Gutsy, but if it works, let me know.
First off, remember that fprint is not entirely stable, and may not work all the time. A list of supported devices is here, and the list of unsupported devices is here.
1. First thing to do is add the [third-party] fprint repository to your sources file:
echo -e "# Fingerprint reader support (fprint)\ndeb http://ppa.launchpad.net/madman2k/ubuntu hardy main restricted universe multiverse" | sudo tee -a /etc/apt/sources.list2. Next, update your sources and install fprint:
sudo apt-get update
sudo apt-get install fprint-demo libfprint-dev libfprint0 libpam-fprint
3. Now you can enroll your fingers using either the terminal or a graphical user interface.
Terminal:
pam_fprint_enrollGUI:
fprint_demo4. Last thing to do is configure PAM so that the fingerprint reader can be useful. Open up your PAM authentication file and edit it:
sudo gedit /etc/pam.d/common-auth5. Edit it to contain:
auth sufficient pam_fprint.so
auth required pam_unix.so nullok_secure
6. Enjoy your fingerprint reader support!
Steps 4 and 5 tell Ubuntu to check your fingerprint, and if that fails, then ask your password. This rule has some exceptions, one that I have encountered is on the login screen. I have to scan my fingerprint before typing my password. One thing I did notice is that when you use sudo in the terminal, it asks for your fingerprint, which I thought was pretty cool. One disadvantage is that anything using gksu does not seem to work properly, specifically because it does not tell you to scan your finger when needed.
Troubleshooting:
The one problem I ran into when using fprint was that I could not run fprint_demo without sudo. It failed with the error message below:
uru4000:error [dev_init] interface claim failed
fp:error [fp_dev_open] device initialisation failed, driver=uru4000
I decided to post my problem here on the forums.
Here is the solution. You have to add yourself to the plugdev group and then change the permissions of the usb folder to allow access to the plugdev group. You can verify you are in the plugdev group by using groups:
sudo usermod -a -G plugdev $USER
groups | grep plugdev      # Make sure there is output from this
sudo chgrp -R plugdev /dev/bus/usb/
Then try running fprint_demo, and hopefully it will work:
fprint_demoThis content was found on the Ubuntu forums, please see here for updates
Easily Create Seperate Home partition with existing Drive or Partition without the need for a livecd in Ubuntu Linux
I recently wanted to create a seperate /home partition since I installed home on / and didnt want the hassle of waiting for the livecd to boot, so here is an easy tutorial that will explain how to setup a seperate /home partition with an existing empty drive or partition you already have without using a livecd.
Ok I have almost always had a seperate home partition, excluding the 3 times I have completely crashed my system and had to redo it all.
Reasons you should use a seperate home partition:
1. Easy backup/restore.
2. You can simply rm -rf / and pop in a livecd and be able to mount your home partition as /home without deleting users home directories and files.
3. You can use multiple linux Distro's with the /home partition
4. You dont have to worrie about the hassle of re-installing or upgrading ubuntu because everything you need is in your /home directory, you can simply backup all your apt packages via aptoncd.
5. You will get better performance accessing files in your /home directory since it is seperate from the filesystem.
First we sudo root then open/edit our /etc/fstab:sudo -s
sudo gedit /etc/fstab
Now this is the line my fstab contained that we will comment out by putting a "#" symbol in front of the UUID of the empty drive# /dev/sdb1
UUID=ffa4a03e-116f-4c41-8bb6-4f60bca8f7f9 /media/sdb1 ext3 defaults,noatime,errors=remount-ro 0 0
It will then look like this:# /dev/sdb1
# UUID=ffa4a03e-116f-4c41-8bb6-4f60bca8f7f9 /media/sdb1 ext3 defaults,noatime,errors=remount-ro 0 0
Now lets scroll down to the bottom of the file and Create a new Line to make our empty disk be mounted as /home# /dev/sdb1
UUID=ffa4a03e-116f-4c41-8bb6-4f60bca8f7f9 /home ext3 defaults,noatime,errors=remount-ro 0 0
Ok the Hard stuff is done, so we Save /etc/fstab with ctrl-s and exit, lets go back to the terminal and cd to /home:cd /home
Ok now that we are in home we can issue our copy command to copy the contents of /home to our existing partition in /media/sdb1 as an example:find . -depth -print0 | sudo cpio --null --sparse -pvd /media/sdb1/
Once this completes which will take a while if you have allot of data we mv the contents of our existing /home to a backup directory: mkdir /oldhome
mv -R * /oldhome
Ok we are done, simply reboot and everything should be successful, if for some reason this doesn't work all you do is uncomment the fstab line we first edited and comment out the newest line or completely remove it, then umount /dev/"yourdrive" if it mounted, and cd /oldhome/ mv -R * /home and everything should be back to what it was when you rebooted
This took me 5 min to create and is very dangerous if you dont know what you are doing, do not attempt this.
I have an alternate tutorial that explains how to do the same thing above with instructions on creating a new partition here
Howto: Change Windows Administrator password in Ubuntu Hardy Heron Easily
I absolutely hate microsoft products thats why I love breaking it. This hack, is way too easy. Whatever your reason for changing any users password, this simple howto will surely satisfy that need. The only way to prevent this currently is with full disk encryption. Here is how you change windows password within Ubuntu Hardy Heron.
You can either use your livecd or hddsudo apt-get install chntpw
Now its installed, so lets get to work...
Ok I am assuming your using a hardy heron livecd or a Ubuntu Hardy Heron full install
You will now need to mount the windows partition read/write permission then navigate to %systemroot%/system32/config
Once your located in the config directory issue this command to change the passwordchntpw -u administrator SAM
- Prompt for password for 'administrator', if found (otherwise do nothing) use * to blank
Now reboot and login to winblows
Optionally you can skip resetting the password and just install Ubuntu
Crack your Zip Files in Ubuntu with the Ultimate Zip Cracker
Why, the hell, another zip cracker? fcrackzip isnt just any other file cracker, it is quiet old (born in 1998) and I believe the last version was from 2004. However it is simple mentioned for being the first open-sourced zip-cracker out there.
fcrackzip searches each zipfile given for encrypted files and tries to guess the password. All files must be encrypted with the same password, the more files you provide, the better.
FCrackZip is The Ultimate password cracker for zip archives
fcrackzip is a fast password cracker partly written in assembler.
It is able to crack password protected zip files with brute
force or dictionary based attacks, optionally testing with
unzip its results.
It can also crack cpmask'ed images.
Homepage: http://www.goof.com/pcg/marc/fcrackzip.html
How to Install:sudo apt-get install fcrackzip
Install with 1-click if you have apt-url installed and your using firefox!
Examples:fcrackzip -c a -p aaaaaa sample.zip checks the encrypted files in sample.zip for all lowercase 6 character passwords (aaaaaa ... abaaba ... ghfgrg ... zzzzzz).
fcrackzip --method cpmask --charset A --init AAAA test.ppm checks the obscured image test.ppm for all four character passwords. -TP fcrackzip -D -p passwords.txt sample.zip check for every password listed in the file passwords.txt.
More info from the authors site here
Need to crack rar, 7z files? Check here for another tool ive unleashed
Howto: Install New Google Earth 4.3 (Beta) In Ubuntu Linux The easy way!
A Brand new Google Earth 4.3 is in Town with Some Hot new features, check out this *HOT* Youtube video while easily installing this with my simple howto!
Easily Install Google Earth 4.3 by opening a terminal and issuing this one commandwget http://dl.google.com/earth/client/current/GoogleEarthLinux.bin ; chmod +x GoogleEarthLinux.bin ; sudo ./GoogleEarthLinux.bin
The above command will auto-install to /opt/google-earth and create a desktop icon for all users. Right after the install Click Start to startup Google Earth
Need a Userguide for all the features? Click here for that
Create Sitemap in Ubuntu Linux With Google SiteMap Generator
It looks like google has a little known tool that creates sitemaps with a simple python script, its in the repositories and this could surely be handy for allot of webmasters out there.
The Google Sitemap Generator is a Python script that creates a Sitemap for your site using the Sitemap Protocol. This script can create Sitemaps from URL lists, web server directories, or from access logs. In order to use this script:
- You must be able to connect to and run scripts on your web server.
- Your web server must have Python 2.2 or later installed.
- You must know the command that launches Python. (Generally, this is python, but may vary by installation. For instance, if the web server has two versions of Python installed, the earlier version may be invoked by the command python and the later version may be invoked by the command python2.)
- You must know the directory path to your site. If your web server hosts one site, this may be a path such as var/www/html. If you have a virtual server that hosts multiple sites, this may be a path such as home/virtual/site1/fst/var/www/html.
- You must be able to upload files to your web server (for instance, using FTP).
- If you will be generating a list of URLs based on access logs, you must know the encoding used for those logs and the complete path to them.
If you aren't sure about any of this, you can check with your web hosting company.
Now you’re ready to get started. Here’s an overview of what you’ll need to do.
- Download the Sitemap Generator program files.
- Create a configuration file for your site using the provided example_config.xml file as a template. Modify this file as needed for your site and save it.
- Upload the necessary files to your web server.
- Run google-sitemapgen
- Add the generated Sitemap to your Google webmaster tools account.
- Set up a recurring script. (optional)
sudo apt-get install google-sitemapgenIf you are unable to use the Sitemap Generator, you can add a Sitemap to your Google webmaster tools account in another format, such as a simple text file. Third-party programs supporting the Sitemap Protocol.
Get 8500+ Free Clipart .SVG's For Gimp, Inkscape, website!
Ever wonder where you can get free open images to edit and use without worrying about copyright? Well I have looked everywhere, and I have found a nice collection that you all can use and share. I was recently looking for some clipart online and ran across a simple way to get thousands of updated Clipart .SVG's. This will be 800+ meg's when extracted.
If you want to browse the gallery before downloading check it out here
Download/extraction Instructions:sudo apt-get install openclipart-svg
I hope you enjoy this clipart, is there any others worth mentioning?
Thank Elkersh for this great tip!
Block Bad IP Ranges with iplist in Ubuntu Linux!
In todays world we need some protection against the anti-P2P organizations, script kiddies and big brother, Iplist is a kick-ass tool that will help protect your privacy!
What is iplist?
iplist is a list based packet handler which uses the netfilter netlink-queue library (kernel 2.6.14 or later). It filters by IP-address and is optimized for thousands of IP-address ranges.
Some typical reasons for using iplist are:
- to protect your privacy while sharing with others on p2p networks
- to ban unwanted clients from servers
- to block whole countries or networks
- to block spam- and ad-servers
- to block known hackers
wget http://internap.dl.sourceforge.net/sourceforge/iplist/iplist_0.19-0hardy2_i386.debsudo dpkg -i iplist_0.19-0hardy2_i386.debThere is packages for all other Ubuntu/Linux Versions Here
After the installation ipblock can be found in main menu -> Internet -> ipblock.
 Lists
ListsThe default choice for lists is similar to peerguardian, you have the option to add/remove what you need.
- level1.gz - Anti-p2p companies, Fake p2p file sources, Government, Military, Science, Research Labs, Bad Education facilities, and more.
- ads-trackers-and-bad-pr0n.gz - Advertising and data tracker servers
- spyware.gz - Malicious spyware and adware servers
- edu.gz - Educational institutions and universities
- bogon.gz - Spoofed IP-addresses
 Settings
All options can be configured in this tab. Auto-updating lists is important and the default choice of 2 days is reasonable because www.bluetack.co.uk updates their lists 3 times per week. Using out-of-date lists is not recommended.
To ignore specific network traffic like HTTP or EMAIL (pop3) use the ignored ports section.

More information can be found @ the developers site here
More information on Blocklists can be found here
Google Gadgets Now work on Ubuntu Linux with Screenlets!
Hey all, I just ran into a neat video on YouTube, it seems you can now get Screenlets to use Google Gadgets here is a video that shows you how!
If you need screenlets follow these directions to install by adding a getdeb.net mirror:sudo -s
echo "deb http://ubuntu.org.ua getdeb/" >> /etc/apt/sources.list
apt-get update
apt-get install screenlets screenlets-doc
exit
Once Installed follow the instructions within the video to get Google Gadgets up and Running!
Here is hundreds more of Screenlets to choose from!
Howto: Create TTY User to view logs via TTY in Ubuntu Linux
We all have various log files on our Ubuntu system, and sometimes it is nice to be able to easily view a log file within a tty. Here is a simple howto, to create a tty user that's only purpose is to watch a log file
First lets create the logging script after sudo -s:cat >>/usr/bin/logwatch
Paste this, then control-c when its pasted in the terminal, alternatively you can use a text editor..#! /bin/bash
watch tail -n 80 /var/log/messages
Note: You can replace /var/log/messages with any log you choose, like a firewall log for instance.
Make /var/log/messages Readable and our script executable, for this I'll use chmod:chmod 644 /var/log/messages
chmod +x /usr/bin/logwatch
Now append /usr/bin/logwatch to /etc/shells then save/exitgedit /etc/shells
Now lets create the user that we can login via the TTYadduser logwatch --shell /usr/bin/logwatch
Set a password, like "logwatch"
Now lets try this out, all you need to do now is simply press ALT-CTRL-F1 or any other TTY from F1-F6 then login as "logwatch" with password "logwatch", what will happen is the user will be logged into our /usr/bin/logwatch script and only be able to watch the log, so we can cycle between tty's and X
Howto: Mount .ISO, .IMG, .BIN, .MDF, and .NRG in Ubuntu Linux The Easy way
I download .iso's all the time, and wanted to be able to mount iso's for winblows games on wine. What this does is map your iso to a filesystem directory. Here is what I did, and here is what you can do as well.
First grab fuseisosudo apt-get install fuseiso
If you are in firefox and have apt-url installed click here to install with one click!
Then lets add ourselves to the fuse usergroupsudo adduser myusename fuse
If you were not in the fuse group you will need to log off, then back in right now.
Now lets create ourselves a fuseiso folder to mount our isosudo mkdir /media/fuseiso
Now we just grabbed an iso off the net, so lets mount it!sudo fuseiso myisofile.iso /media/fuseiso
Ok now the iso is mounted and we can use it like its a cd/dvd
Nautilus/cd your way to /media/fuseiso and the files from the iso will be mounted readonly.
More information on fuseiso can be found here
Crack Pdf Files with Ubuntu Linux!
Dont you hate when you run into a locked down pdf on the web? I search google all the time for title filetype:pdf and some are locked, this is the solution! PDFCrack is a GNU/Linux (other POSIX-compatible systems should work too) tool for recovering passwords and content from PDF-files. It is small, command line driven without external dependencies. The application is Open Source (GPL).
Features
* Supports the standard security handler (revision 2 and 3) on all known PDF-versions
* Supports cracking both owner and userpasswords
* Both wordlists and bruteforcing the password is supported
* Simple permutations (currently only trying first character as Upper Case)
* Save/Load a running job
* Simple benchmarking
* Optimised search for owner-password when user-password is known
Install pdfcrack in Ubuntusudo aptitude install pdfcrack
pdfcrack Syntaxpdfcrack -f filename [options]
pdfcrack Options
-b, - -bench - Perform benchmark and exit.
-c, - -charset=STRING - Use the characters in STRING as charset.
-m, - -maxpw=INTEGER - Stop when reaching INTEGER as password length.
-n, - -minpw=INTEGER - Skip trying passwords shorter than INTEGER.
-l, - -loadState=FILE - Continue from the state saved in FILENAME.
-o, - -owner - Work with the ownerpassword.
-p, –password=STRING - Uses STRING as userpassword to speed up breaking ownerpassword (implies -o).
-q, - -quiet - Run quietly.
-s, - -permutate - Try permutating the passwords (currently only supports switching
first character to uppercase).
-u, - -user - Work with the userpassword (default).
-v, - -version - Print version and exit.
-w, - -wordlist=FILE - Use FILE as source of passwords to try.
pdfcrack Examplepdfcrack mylocked.pdf
More information on this great utility can be found @ the authors site here
Lifehacker.com Has some alternative utilities and ideas for cracking pdf's here
UbuntuGeek has some information about this tool here
Howto: Crack Rar, 7z, and zip files with RarCrack in Ubuntu Linux
This program uses bruteforce algorithm to find correct password. You can specify which characters will be used in password generations.
Download RarCrack
wget http://superb-east.dl.sourceforge.net/sourceforge/rarcrack/rarcrack-0.2.tar.bz2 Install RarCrack
tar xvjf rarcrack-0.2.tar.bz2cd rarcrack-0.2sudo apt-get install libxml2-devmake ; sudo make installUsing RarCrack:
rarcrack your_encrypted_archive.ext [--threads thread_num] [--type rar|zip|7z]After the cracking started RarCrack will print the current status of cracking and save it's to a status file. If you want more specific password character set, you need to run RarCrack to create the XML status file (3 sec).
There will be a sample XML file, and you see there is a character set. If you want, you can modify this file and when you start RarCrack again the program will be use new variables.
Warning: Take care when you changing this file, make sure the current password don't have characters outside the abc[character set]!
Know of any other rar/zip/7z cracking tools worth mentioning?
More information on rarcrack can be found here
Convert Audio to other formats with Ease using Sox in Ubuntu Linux
SoX is the swiss army knife of sound processing programs. SoX is a command line utility that can convert various formats of computer audio files in to other formats. It can also apply various effects to these sound files during the conversion. As an added bonus, SoX can play and record audio files on several unix-style platforms. SoX is a general purpose sound converter/player/recorder that supports the following formats:
- RAW sound data in various data styles
- RAW textual sound data
- Amiga 8svx files
- Apple/SGI AIFF files
- SUN .au files
- PCM, U-law, A-law, G7xx ADPCM files
- mutant DEC .au files
- NeXT .snd files
- AVR files
- CD-R data (music CD format)
- CVS and VMS files (continous variable slope)
- GSM raw data (with optional library)
- Macintosh HCOM files
- Amiga MAUD files
- MP3 files (with optional external library)
- IRCAM SoundFile files
- NIST SPHERE files
- Turtle beach SampleVision files
- Soundtool (DOS) files
- Yamaha TX-16W sampler files
- Sound Blaster .VOC files
- Ogg Vorbis files (with optional external library)
- FLAC files (with optional external library)
- Dialogic/OKI ADPCM .VOX files
- Microsoft .WAV files
- PCM, U-law, A-law, MS ADPCM, IMA ADPCM, GSM, RIFX (big endian)
- Psion (PDA) Record.app files and A-law .WVE files
- Maxis XA Audio files
- EA ADPCM (read support only)
- Record and Play audio on various Unix platforms.
- null file type that reads and writes from/to nothing.
sox myfile.mp3 myfile.oggThe above command converts mp3 to ogg which is a cleaner format to use, you can use this command to convert files to any format above by just adding the file extention you want it converted to.
Then we can play the ogg file right from the command line and add a lil extra bass :)
play myfile.ogg bass +3 More information can be found on SoX on the developer's page here
Top Linux BitTorrent Clients For Ubuntu
I use BitTorrent for downloading music, movies and linux distro's. Back in the day bitTorrent didnt exist and I relied on bbs and ftp, these are two direct, centrally located ways that I shared files in the past. I also have played around with XDCC's on irc, gnutella, which most people know as limewire. While I will always prefer the old ways, like dialing up to the local bbs and logging in to a ftp, or swinging by an xdcc channel, the new alternative is... "just ok for now" I hope it is better optimized, more secure, and more anonymous in the future. I have tried all the command line BitTorrent clients, and they are awesome with memory/cpu usage but that isnt the preferred way anymore, most resort to GUI clients, and there are a few to choose from that kick ass. Here is a few to think about:
What is Deluge?
Deluge is a full-featured BitTorrent client for Linux, Mac OS X and Windows. It uses libtorrent in it's backend and PyGTK for it's user interface.
Deluge features a rich plugin collection; in fact, most of Deluge's functionality is available in the form of plugins.
Deluge was created with the intention of being lightweight and unobtrusive. It is our belief that downloading shouldn't be the primary task on your computer and therefore shouldn’t monopolize system resources.
Deluge is not designed for any one desktop environment and will work just fine in GNOME, KDE, XFCE and others.
Deluge is Free Software and is licensed under the GNU General Public License.
What about features?
Deluge has a wide-array of features, including:
- Web UI
- BitTorrent Protocol Encryption - Ability to force Encryption Inbound/Outbound, force handshake or full stream encryption
- Highly Configurable Network Settings - Tweakability
- Mainline DHT
- Local Peer Discovery (aka LSD)
- FAST protocol extension
- µTorrent Peer Exchange
- UPnP and NAT-PMP
- Proxy support
- Web seed
- Private Torrents
- Global and per-torrent speed limits
- Configurable bandwidth scheduler
- Password protection
- RSS
- Block List Importer - Import anti-P2P ip lists
- Desired Ratio Plugin
- Event Logging - logs blocked ip's network errors and network statistics/errors and other info
- Speed Limiter - Limit the speed per torrent upload/download
- Prioritize Files - Easily Select Downloadable files instead of every file in the torrent
- Network Health Monitor
- Torrent Creation
- Torrent Scheduler
- Low memory/cpu usage!
- And much more
How do I Install Deluge?
Click Here for one click Install if you are running Firefox with apt-url installed or:
sudo apt-get install deluge-torrentHow do I hack deluge to work on private trackers?
Check my older post that still works here on How to make deluge sp00f: http://www.ubuntu-unleashed.com/2007/09/setup-and-spoof-deluge-bittorent-client.html
What is Transmission?
Transmission is a lightweight client, for people that do not care about extra features, that want just a standard BitTorrent Client.What about features?
- Selective downloading and file prioritizing
- Encryption support, with option to ignore unencrypted peers
- Torrent file creation
- Peer exchange (compatible with Azureus and μTorrent)
- Automatic port mapping (using UPnP/NAT-PMP)
- MSE Tracker Extension support
- Fast Resume - with peer caching
- Auto-banning of peers who send bad data
- Sort and filter by tracker
- Single listening port for all torrents
How do I Install Transmission?
Click Here for one click Install if you are running Firefox with apt-url installed or:
sudo apt-get install transmissionWhat is Ktorrent?
KTorrent is a BitTorrent client written in C++ for KDE using the Qt user interface toolkit. It is maintained in the KDE Extragear. This is probably the best kde torrent client, but uses allot of cpu/ram
Features
- Upload and download speed capping / throttling & scheduling
- Internet searching with torrent search engines using KHTML part.
- Support for UDP trackers.
- IP address blacklist plugin
- Port forwarding with UPnP (Universal Plug and Play)
- Protocol encryption
- DHT (mainline version), and support for trackerless torrents
- µTorrent peer exchange (PEX) support (as of 2.1 RC1).
- File Prioritization
- Ability to import partially-downloaded files
- Directory scanner to automatically watch directories for new torrents
- Manual addition of trackers to torrents
- RSS feed support
- Web interface plugin with default por number 8080
How do I Install Ktorrent?
Click Here for one click Install if you are running Firefox with apt-url installed or:
sudo apt-get install ktorrentWhat is Azureus?
Azureus is a Bittorrent client written in java and comes bundled with many invaluable features for both beginners and advanced users that is very bloated...
What about features?
- Multiple torrent downloads
- Upload and download speed limiting, both globally and per torrent
- Advanced seeding rules
- Adjustable disk cache
- Only uses one port for all the torrents
- UPnP sets the forward on your router
- Can use a proxy, for both tracker and peer communications
- Fast resume
- Can set a default download dir and move completed files
- Can import torrents automatically from a set dir
- Highly customizable interface
- IRC plugin included for quick help
- Embedded tracker, host your own torrents, automate your shares (periodic scanning of a dir)…
- Distributed Hash Table: host on it a completely decentralised torrent and/or benefit from it when the tracker is offline.
- Auto-adjustment of your upload and download speeds according to your network charge with Autospeed
- Auto-download torrents with RSS Feed Scanner
- Schedule upload and download speed limits with Speed Scheduler
- Receive a mail when a download finishes with Status Mailer
- Add numerous info on torrents (Extra seeding columns, Country Locator)
- Remote control Azureus through the Swing Web Interface or the HTML Web Interface
Click Here for one click Install if you are running Firefox with apt-url installed or:
sudo apt-get install azureusYou Want A Terminal BitTorrent Client eh?
rtorrent/libtorrent is a nice ncurses based client, check it out here or apt-get install rtorrent
Got anything else worth mentioning?
Howto: Install awesome Music Visualizations for Rythmbox and XMMS In Ubuntu


I absolutely love visualizations while listening to music, its unfortunate that Ubuntu does not currently have many presets, Fortunately here is a quick way to enjoy a few other visualizations in Ubuntu, personally I think these visualizations should have been installed by default with Rythmbox!
If your in Firefox and have apt-url installed click here to install this with one click!sudo apt-get install libvisual-0.4-plugins
Ok now Reload Rythmbox and click on Visualization, and you will get a drop down List of the GOOM Alternative Visuals
Hopefully when I get a chance I will port over winamp visuals to rythmbox but, that may take some time hehe
Detect Port Scans on your Ubuntu System
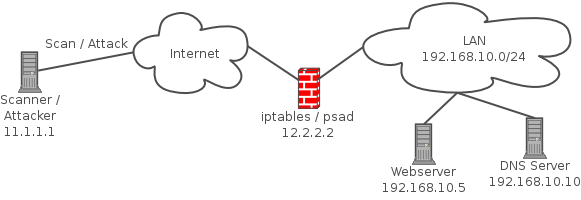
PSAD is a collection of four lightweight system daemons written in Perl and in C that is designed to work with Linux firewalling code (iptables in the 2.4.x kernels, and ipchains in the 2.2.x kernels) to detect port scans. It features a set of highly configurable danger thresholds (with sensible defaults provided), verbose alert messages that include the source, destination, scanned port range, begin and end times, tcp flags and corresponding nmap options (Linux 2.4.x kernels only), reverse DNS info, email alerting, and automatic blocking of offending ip addresses via dynamic configuration of ipchains/iptables firewall rulesets. In addition, for the 2.4.x kernels psad incorporates many of the tcp signatures included in Snort to detect highly suspect scans.
Lets install it shall we?
clickme for 1-click install or:sudo apt-get install psad
To check PSAD status simply run:sudo psad -S
or psad –Status
For more Detailed documentation about PSAD configuration, alerting and logging howto check out:
http://www.cipherdyne.org/psad/docs/
Clean up Duplicate Files, Symlinks, Directories in Ubuntu with an easy GUI!

I have 8TB of archived music, movies, games, applications,iso's, and documents from the past 12 years that I have saved and accumulated and have been plagued by having the same files copied in multiple locations across all my drives. Over the years I have re-downloaded music, movies, and tons of other things that I already have... It really sucks when I download something and run this application and notice I already have it... Other than this issue, I have gigs of config files that are duplicates that needed to be cleaned. So ive been using a program called FSLint, It means Filesystem Lint. So lets get to work and clean the lint from our drives shall we?
Lets install FsLint
clickme for 1-click install! or:sudo apt-get install fslint
Ok now that FsLint is install you will be able to access it via Applications->System Tools->FSLint
As default it will have your home directory selected.
Here are the options you have to choose from:
Find Duplicate Files
Find Installed Packages
Find Bad Named files
Find Name Clashes
Find Temp Files
Find Bad/Broken Symlinks
Find Bad Id's
Find Empty Directories
Find Non-Striped Binaries
Find Redundant Whitespace
You are given Advanced Search options to exclude certain directories that dont apply to the above Search Patterns
Once you select one of the search options and select your search directory, click find, it will take a while depending on drive speed, processing power, and drive size. Once done searching it will give you options to delete the duplicates, save duplicate list and Merge.
I hope this tool is helpful to others, I personally think this tool should be integrated into nautilus.
Happy Cleaning!
Howto:Recover and Undelete files in Ubuntu the easy way!
Ok I accidentally deleted my /etc/network/interfaces file and didnt have my access point connected to a pc, its just wireless now, so what I did to recover the file was this, please note if you delete the file shutdown your pc immediately or unmount your drive as fast as possible to avoid overwriting the deleted data. This method can be used to find unencrypted passwords and interesting information as well. This works best from a livecd/unmounted filesystem:grep --binary-files=text -300 "Unique String in Text file" /dev/hda1 > output.txt
The -300 option tells grep to report the 300 lines before the string you choose
Basically this will take quite a while depending on the size of your hard drive and may output a ton of irrelevent information to the output.txt file, you may want to edit the -300 line variable and do man grep to see further usage options.
This method worked for me only because I shutdown my pc immediately and booted into my Hardy Livecd and the file was still available, I just copied/pasted the relevant output to my interfaces file.
[update]
Alternatively you can use the strings command to dump all the text on a partition then grep the strings output for the relevent output, Here is an example:strings /dev/hda1 > bigtxtfilegrep -i "information" bigtxtfile >grepoutputfile
[update 2]
I ran into another program that is utterly Amazing, actually quite scary, I was able to recover photo's deleted from months ago, even after reading/writing the drive. So now I will need to find a tool to wipe what was deleted lol.. Here is some info..
Foremost is a console program to recover files based on their headers, footers, and internal data structures. This process is commonly referred to as data carving. Foremost can work on image files, such as those generated by dd, Safeback, Encase, etc, or directly on a drive. The headers and footers can be specified by a configuration file or you can use command line switches to specify built-in file types. These built-in types look at the data structures of a given file format allowing for a more reliable and faster recovery.
Originally developed by the United States Air Force Office of Special Investigations and The Center for Information Systems Security Studies and Research , foremost has been opened to the general public
source code http://foremost.sourceforge.net/
Grab foremost:sudo apt-get install foremost
Have Foremost audit your drive for recoverable files:sudo foremost -w -i /dev/hda -o /recovery/foremost
Have foremost recover jpg files:sudo foremost -t jpg -i /dev/hda -o /recovery/foremost
Here is the complete list of recoverable filetypes for usage with the "-t type" switch:
Available types:
jpg Support for the JFIF and Exif formats including implementations
gif
png
bmp Support for windows bmp format.
avi
exe Support for Windows PE binaries, will extract DLL and EXE files
along with their compile times.
mpg Support for most MPEG files (must begin with 0x000001BA)
wav
riff This will extract AVI and RIFF since they use the same file for‐
mat (RIFF). note faster than running each separately.
wmv Note may also extract -wma files as they have similar format. mov
ole This will grab any file using the OLE file structure. This includes PowerPoint, Word, Excel, Access, and StarWriter
doc Note it is more efficient to run OLE as you get more bang for your buck. If you wish to ignore all other ole files then use this.
zip Note is will extract .jar files as well because they use a simi‐
lar format. Open Office docs are just zip’d XML files so they are extracted as well. These include SXW, SXC, SXI, and SX? for undetermined OpenOffice files.
rar
htm
cpp C source code detection, note this is primitive and may generate documents other than C code.
all Run all pre-defined extraction methods. [Default if no -t is specified]
If you have additional suggestions or methods to restore files please comment and share your knowledge


