VirtualBox 1.50 Virtualization Solution
There is a new version of virtual box out, I love this freeware virtualization solution that is less bloated and more efficient then Vmware. You really dont need any help installing this and running this, it has the simplest gui ever as you see above. It comes with full documentation, check it out!
Direct download:
VirtualBox 1.5.0 for Linux Hosts:
ChangeLog
VirtualBox 1.5.0 (released 2007-09-03)
- Major: Seamless windows
- Major: Virtual serial ports
- Major: Support for 64-bit Windows hosts
- Major: Intel PXE 2.1 network boot
- Major: Guest Additions for IBM OS/2 Warp
- GUI: sometimes two mouse cursors were visible when Windows guest additions became active
- GUI: added VT-x/AMD-V settings
- GUI: disable 'Show log...' menu entry to prevent crash if VM list is empty
- GUI: the log window grabbed the keyboard
- GUI: fixed error handling if Linux host clipboard initialization fails
- GUI: pass the Pause key and the PrtScrn key to the guest (Linux hosts)
- GUI: increased maximum guest RAM to 2 GB (Windows host)
- GUI: improved rendering performance (Windows host)
- GUI: status lights for USB and shared folders
- GUI: properly respect the DISPLAY environment variable
- GUI: download Guest Additions from virtualbox.org in case they are not present locally
- VRDP: support for multimonitor configurations in Windows guests
- VRDP: support for MS RDP6 and MS RDP Mac clients
- VRDP: added support for WinConnect RDP client
- VRDP: performance improvements
- VRDP: fixed sporadic client disconnects
- VBoxManage: never delete existing target during clonevdi
- VBoxManage: properly print the size of currently used hard disks
- VMM: fixed Xandros Desktop 4.1 hang
- VMM: fixed VT-x/AMD-V hang with newer versions of gcc (Linux hosts)
- VMM: improved stability of VT-x
- VMM: check for disabled AMD-V when detecting support
- VMM: fixed AMD-V issue when running OS/2 guests
- VMM: fixed application startup regressions (e.g. VideoReDo)
- VMM: fixed regression that broke disk access in OS/2 and OpenBSD guests (possibly much more)
- VMM: fixed crashes if memory allocation failed (Linux)
- VMM: fixed enabling of Local APIC on AMD hosts (fixed Ubuntu Feisty installation kernel hang during boot)
- VMM: fixed XFree86 4.3 (Debian/Sarge) segfaults when switching to text mode
- VMM: refuse to start when KVM is active (Linux Host)
- VMM: fixed bootup hangs with ReactOS
- VMM: fixed out-of-memory errors under certain environments with enough appropriate memory available
- API: fixed occassional crashes of the VBoxSVC server during VM shutdown (Linux host)
- API: some components were not notified when mounting a CD/DVD
- VMDK: improve geometry compatibility with existing VDMK images
- IDE/Floppy: optionally make non-available host device non-fatal
- IDE: improve emulation accuracy of the IRQ line between master and slave drive
- IDE: guest could freeze when unmounting the CD/DVD drive
- VGA: several text mode fixes in particular with Windows DOS boxes
- USB: fixed some issues with Windows hosts
- USB: fixed race condition between udev and USB filters (Linux host)
- Shared Folders: reversed network provider order to increase mapping performance (Windows guest)
- Shared Folders: browsable from Windows Explorer (Windows guests)
- Shared Folders: stability fixes (Windows guest)
- Shared Folders: case sensitivity fixes (Windows guest and Linux host)
- Audio: fall back to the NULL audio driver if no voice could be opened
- NAT: fixed crash
- Guest Additions: reworked the shared clipboard for Linux hosts and guests based on user feedback about problems with individual applications
- Guest Additions: don't allow to disable mouse pointer integration for Linux guests as an Xorg hardware mouse cursor cannot be turned into a software mouse cursor
- Guest Additions: Linux guests shipping Xorg 1.3 (e.g. Fedora 7, Ubuntu Gutsy) are now supported
- Guest Additions: added DirectDraw support to the Windows display driver
Type rest of the post here
Read and write filesystems (ext, xfs, jfs,zfs) under Windows)
The Idea:
Windows XP install a VMware workstation, make a new Ubuntu virtual machine with NAT networking, install Ubuntu onto the virtual machine, stop it, go to the virtual machine's settings, connect your HDDs which contains Linux-like partitions and You want to use them to Your virtual machine. Then boot it up, locate the drives, than put them into the fstab. After that setup a SAMBA server, and share your drives. Now you can discover your drives via windows networks.
What you need:
- Microsoft Windows XP SP2
- VMware Workstation (You can download and use it for 30 days for free. When You finetuned your virtual machine You can change workstation to player which is full free.)
- Ubuntu 7.04
- Linux like partitions connected
- Time
Tested with:
- Windows XP Professional SP2 (With fresh drivers.)
- Ubuntu Feisty Fawn 7.04 Desktop
- VMware workstation 6
- My config is: Intel Hyperthread 3.0ghz +, 768GB RAM, WD HDD with XFS partitions
Howto:
1. Boot up Your Windows. Be sure, your Linux HDDs are connected. Check in Device Manager. The HDDs must appear there. (Not the partitions.)
2. Download VMware workstation, get a registration key, and install it.
3. Create a new virtual machine for Ubuntu or 2.6 Linux OS. I recommend 6-8GB virtual drive, half of your system RAM, and NAT networking.
4. Insert Your Ubuntu CD, and start the virtual machine. Install a normal Ubuntu system.
5. Shutdown Your installed virtual machine, open its settings, add your HDDs to the virtual machine. Then start it again.
Be careful! After the previous step your partitions are online, and accessible, writable etc... So look after your important files!
6. Locate the names of your partitions device name. (Tip: You can find it at System->Settings->Hardware information find your HDDs with them volumes, than click on Advanced. There you can see the device name.)
7. Insert your partitions into fstab:
You must know the filesystem's name. (You can get this information from Hardwareinformation too.)
Open a new folder in /media as a mounting point for the partition and set its permissions.
Open a terminal:su
mkdir /media/*mountpoint
chmod 777 /media/*mountpoint
Now open the fstab for editing.gedit /etc/fstab
*devicename *mountingpoint *filesystem defaults 0 0
For example:/dev/hdb1 /media/hdb1 xfs defaults 0 0
8. Install, and configure Samba. When you finished installion, and added yourself to the server, open System->Administration->Shared folders Set the workgroup, and check in "The computer is a WINS server."
9. Now You can share your partitions. You can permit write permissions if you want.
10. Minimize the virtual machine's resurces. Decrase the shared RAM. Exactly I didn't finish that point. You can dull the system. I think you can stop gdm and other unnecessary services.
11. I recommend a windows reboot, than start the linux virtual machine.
Now you can discover your partitions in the windows networks.
Encrypt your Files with Truecrypt & Forcefield GUI
*update* Truecrypt now has its own GUI, see here , This post remains for archive purposes.
I have always been security conscious, in todays world privacy & security is a thing of the past unless we take matters into our own hands. I have used many types of encryption applications, dm-crypt, luks, cryptsetup, encfs, and truecrypt. personally I like truecrypt more than all the others simply because you can hide encrypted files in encrypted files. This is a form of steganography and is a better deterrant to law enforcement than full disk encryption, with that judges and juries seem to think you are indeed hiding something and you should be punished. I found this powefull little applet for gnome that complements truecrypt very nicely. I can simply right click & and create & mount truecrypt volumes.
This is all you do:
wget http://www.truecrypt.org/downloads/truecrypt-4.3a-ubuntu-7.04-x86.tar.gz
wget http://bockcay.de/stuff/programs/forcefield/forcefield_current_all.deb

sudo apt-get install python-crack python-pexpect cracklib2

tar xfz truecrypt-4.3a-ubuntu-7.04-x86.tar.gz
sudo dpkg -i truecrypt-4.3a/truecrypt_4.3a-0_i386.deb
rm -rf truecrypt-4.3a truecrypt-4.3a-ubuntu-7.04-x86.tar.gz

sudo dpkg -i forcefield_current_all.deb
Choose the fastest Apt Repository With Synaptic
Downloading software from repositories can be a long and daunting task especially when you are downloading from a repository server which is far from your location.
It even can turn out to be an annoying experience when your downloads keeps timing out because of the bad connection between you and the mirror server. Thus it is crucial for us to find the closest/fastest software repository in order to speed up the installation and upgrade process.
In this post I’ll show you how to get the fastest/closest repository server automatically using Synaptic. Here’s how :
First you need to start up Synaptic. Then go to Settings->Repositories.

Click the Download From section, and Select ‘Other‘
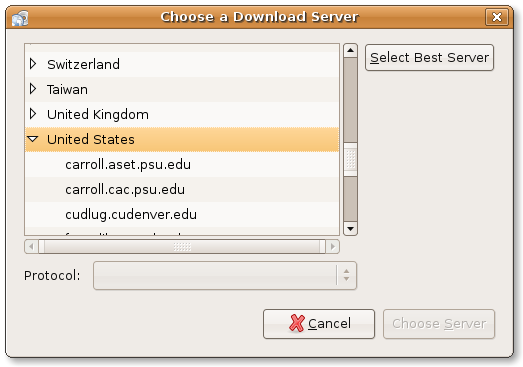
Click “Select Best Server” button to enable synaptic to find the best and fastest repository server for you.
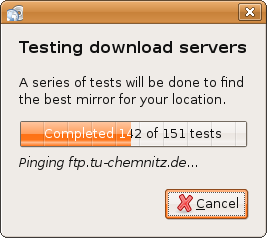
Synaptic will perform automated pinging, and It will select the fastest server based on its calculation. Its nice and easy!
Easily Install Google Desktop & Picasa For Ubuntu
I absolutely love Google, I am a die hard google fan and use google as my homepage, if I dont know google always is my guide and google simplifies my quest to finding information I need online. For a while now google has come to the desktop, first to windows, and not too long ago it came to Linux. I was a fan of beagle but now I prefer google desktop, I press ctrl 2 times and search my desktop or the web without having to click a thing. Here is the quick & easy howto right from the google desktop for linux page and after that I will give you a quicker terminal installation method that saves you the navigation with your mouse. This page will guide you through setting up an Ubuntu 7.04 (Feisty) system to use the Google Linux software repository. For general information, please see the Google's Linux Software Repositories page. Download the key from the Google Linux Package Signing Key page. Choose the "Software Sources" application from the "System/Administation" menu. Click the "Import Key File..." button and select the "linux_signing_key.pub" file you downloaded previously, then click "OK". You should now see the "Google, Inc. Linux Package Signing Key" in the list. In the "Software Sources" application, click the "Third-Party Software" tab, then click the "Add..." button. Enter "deb http://dl.google.com/linux/deb/ stable non-free" for the "APT line:", then click "Add Source". You should now see the new repository in the list. Click "Close" to finish adding the repository. After adding the repository, you will be warned that your software information is out-of-date. Click "Reload" to finish configuring your system to use the new repository. Add the following rule to
I also love picasa, I save all my picture albums, desktop screenshots, wallpapers and more on picasaweb. Once you complete the repository instructions below, just apt-get install picasa or search synaptic or another package manager you Use.GUI Configuration on Ubuntu 7.04 (Feisty)
Key Installation and Usage


Package Manager Configuration


Alternate Command Line Configuration
Run these commands as root: wget -q -O - https://dl-ssl.google.com/linux/linux_signing_key.pub | apt-key add -
Recent versions of
apt-get update apt-get will automatically attempt to verify packages on download. If an appropriate key is not found or if the package is corrupted, you will get a message like the following: WARNING: The following packages cannot be authenticated!
packagename /etc/apt/sources.listnano
then use /etc/apt/sources.list
# Google software repository
deb http://dl.google.com/linux/deb/ stable non-free apt to update then installsudo apt-get update
sudo apt-get install google-desktop-linux
Once everything has downloaded and installed, press alt-ctrl backspace to restart gdm and log back in and then click on enable advanced features.
press ctrl twice to popup a search window
You can also right click the google desktop icon on the gnome task panel for preferences on indexing
Online Privacy and Security Alert
As Franklin says, "Those that would give up liberty in the pursuit of security shall have neither." Besides the impact on the people being watched, the pantopticon often has an adverse effect on the watcher. The panopticon gives the illusion of transparency and completeness – so the watcher comes to believe three fallacies Using Tor protects you against a common form of Internet surveillance known as "traffic analysis." Traffic analysis can be used to infer who is talking to whom over a public network. Knowing the source and destination of your Internet traffic allows others to track your behavior and interests. This can impact your checkbook if, for example, an e-commerce site uses price discrimination based on your country or institution of origin. It can even threaten your job and physical safety by revealing who and where you are. For example, if you're travelling abroad and you connect to your employer's computers to check or send mail, you can inadvertently reveal your national origin and professional affiliation to anyone observing the network, even if the connection is encrypted. How does traffic analysis work? Internet data packets have two parts: a data payload and a header used for routing. The data payload is whatever is being sent, whether that's an email message, a web page, or an audio file. Even if you encrypt the data payload of your communications, traffic analysis still reveals a great deal about what you're doing and, possibly, what you're saying. That's because it focuses on the header, which discloses source, destination, size, timing, and so on. A basic problem for the privacy minded is that the recipient of your communications can see that you sent it by looking at headers. So can authorized intermediaries like Internet service providers, and sometimes unauthorized intermediaries as well. A very simple form of traffic analysis might involve sitting somewhere between sender and recipient on the network, looking at headers. But there are also more powerful kinds of traffic analysis. Some attackers spy on multiple parts of the Internet and use sophisticated statistical techniques to track the communications patterns of many different organizations and individuals. Encryption does not help against these attackers, since it only hides the content of Internet traffic, not the headers.
Recently the government has been infringing on our rights and privacy online globally. This doesnt just effect the United States, the NSA in the United States is and has been logging more than 50% of all internet communications. And most likely All smtp/pop/imap and webmail is probably logged and filtered for certain keywords.
I take Privacy & The freedoms we had and are now loosing seriously.
The Electronic Frontier Foundation has been fighting for our rights for years and needs more support. The EFF has fought the FBI for the past few years and got important information shedding light on DCS-3000 aka Red Hook. This system logs phone communications. And this is just the FBI.. The NSA has the biggest & best computer systems in the world with the most storage and could actively sort/log everything that it needs to.
NSA Affiliated IP ranges: These ip ranges are mostly Name Servers and also full isp's including qwest.net, comcast, cox, sprint, att.. to name a few.. These Ip ranges have been confirmed by thousands of sources that work in ISP's as well as whistleblowers.
I strongly suggest encrypting all your data communications online via the tor network that is sponsored by the Electronic Frontier Foundation at tor.eff.org.
Surveillance & its Effects on society
Surveillance is a process of keeping people (such as customers and employees, as well as members of the public) under close supervision. What are the effects of surveillance? Here are two answers from an interesting blog (now called Into The Machine) whose main purpose seems to be to critique the authoritarian policies of the UK Home Secretary (past and present).
It is clearly important to understand the effects on those being observed. But it is also interesting to note the effects on those doing (or relying upon) the observing.
Jeremy Bentham’s panopticon was originally a prison so designed that the warder could watch all the prisoners at the same time. By extension, this term is used to describe any technical or institutional arrangement to watch/ monitor large numbers of people. It forms part of Foucault's analysis of discipline, and provides a useful metaphor for various modern technologies
The panopticon provides surveillance and may result in a loss of privacy for the people being watched / monitored, but may also make people feel they are being looked after (better quality of service, safer). If you know you’re being watched, this may trigger various feelings – both positive and negative.
This is one of the reasons why surveillance mechanisms often become dysfunctional even for those doing the surveillance. For example, instead of customer relationship management (CRM) promoting better relationships with the customer, it becomes a bureaucratic obsession with the content of the customer databaseWhy we need Tor
Resources:
EFF ACTION CENTER - Support EFF by writing your Congress & State Representatives online for free via fax/email
EFF DEEPLINKS
Cryptome.org - Important Information & news on Privacy & Security Threats
howto on setting up Tor and Vidalia here
Install Tor with Vidalia GUI on Ubuntu
Do you want completely anonymous internet access? For Free? Tor is the open source leader to anonymous connections on the internet, you can anonymize your internet presence from AIM/ICQ/MSN/ Jabber/IRC/WWW/FTP and you can even issue a torify command at the command prompt to anonymize your wget/ssh/lynx/ftp/perl or whatever. Basically tor is for the people by the people, it is only alive because we make it so, we can choose to use it freely or use it freely and help it out by running a server on your computer to make the internet safer. Basically tor encrypts your data communications through chained/linked proxies all over the internet.
Vidalia is a cross-platform controller GUI for Tor, built using the Qt framework. Using Vidalia, you can start and stop Tor, view the status of Tor at a glance, and monitor Tor’s bandwidth usage. Vidalia also makes it easy to contribute to the Tor network by helping you set up and manage your own Tor server.
Vidalia runs on most platforms supported by Qt 4.1 or later, including Windows, Mac OS X, and Linux or other Unix variants using the X11 window system.
Here is how to set it up
First things first get tor.
I prefer to grab the latest version and compile to source but I will give you the quick and easy way.
This will apt get tor and the dependencies, wget vidalia, extract and cd to the directory and configure for you.
sudo apt-get install tor qt4-dev-tools qt4-designer
wget http://vidalia-project.net/dist/vidalia-0.0.14.tar.gz
tar zxvf vidalia-0.0.14.tar.gz
cd vidalia-0.0.14
export QMAKE=/usr/bin/qmake-qt4
./configure --disable-debug
Then just type
sudo make install
once installed press alt F2 and open the run prompt and type in “vidalia” without the quotes, this will start tor, vidalia and you can configure tor/vidalia by right clicking on the tray applet and click on settings, right there you can view all the nodes and choose what to connect to, see node uptimes, os’s and locations with a graphical map.
For secure web browsing in firefox I prefer using an extention named torbutton which you can get here
Read more on torbutton here
Alternatively you can use the less secure FoxyProxy:
FoxyProxy it works well with firefox and swiftfox, you can grab this extention directly from here
Install the addon and go through the Tor wizard and it will set you up for you and you can view which tor nodes you connect through actively via vidalia
I hope you enjoy my first tutorial on ubuntu privacy concerns. I hope many more people use tor and set up a server to anonymize the world.





